Deployment Manager:
Google provides a robust set of sample Deployment Manager templates that you can learn from and build upon. To clone the repository, enter the following commands in Cloud Shell Command Line to create a directory to hold the Deployment Manager sample templates.
For example,
git clone https://github.com/GoogleCloudPlatform/deploymentmanager-samples.git

You can explore the sample files
The main deployment manager configuration file is nodejs.yaml. It makes use of templates to generate infrastructure. The rest of the files are templates. Templates use variables defined in the nodejs.yaml configuration file to produce customized results.
The files included are
1.frontend.py
frontend.py includes frontend.py.schema, which creates an instance template based on container_instance_template.py. This template is used to create a managed instance group and an autoscaler. The template also creates a network load balancer that has a forwarding rule with a single public IP address. It also creates:
- A target pool that refers to the managed instance group.
- A health check attached to the target pool.
2.nodejs.py
nodejs.py includes nodejs.py.schema, which brings the frontend and backend templates together.
- Note that the frontend is
frontend.py. - The backend is
/common/python/container_vm.py. - This is a VM running a Docker container with MySQL, so it doesn’t require a custom template.
3.Other files
/common/python/container_instance_template.py/common/python/container_vm.py/common/python/container_helper.py
You can modify the files for customizing the deployment, such as
- zones
- maximum number of instances in the instance group
Now you’ll use Deployment Manager to deploy the application and make it operational. This builds the infrastructure, but it won’t allow traffic. After Deployment Manager sets up the infrastructure, you can apply service labels.
gcloud deployment-manager deployments create advanced-configuration --config nodejs.yaml
To verify that the application is running, open a browser to access port 8080 and view the service. Since the IP address was established dynamically when the Deployment Manager implemented the global forwarding rule (specified in the template), you’ll need to find that address to test the application.
Find the global load balancer forwarding rule IP address
gcloud compute forwarding-rules list
Open a window in your browser and
http://<your IP address>:8080

For more information,
Apache Bench :
You’ll use Apache Bench to apply load to the service. Watch the DMDash dashboard in Cloud Monitoring to monitor the CPU usage and the Network Inbound Traffic. You’ll also be able to track the number of instances in Cloud Monitoring by mousing over the lines, or by viewing the instances in the Cloud Console
Install Apache Bench:
- Still in the VM Instances window, click the instance-1 SSH button to SSH into the VM you just created.
- Enter the following commands to install the latest ApacheBench:
sudo apt-get update

sudo apt-get -y install apache2-utils
In the SSH window, enter this command for Apache Bench to apply load to the service. Replace your forwarding IP for Your_IP
ab -n 1000 -c 100 http://<Your_IP>:8080/
Run this command two or three times to create traffic,
1.With Auto scaling:
Expected behavior: The load consumed more than 20% of the cumulative CPU in the group, triggering auto scaling. A new instance was started.
2.Without Auto scaling:
Expected behavior: With auto scaling off, no new instances are created, cumulative CPU usage increases.

For more information,
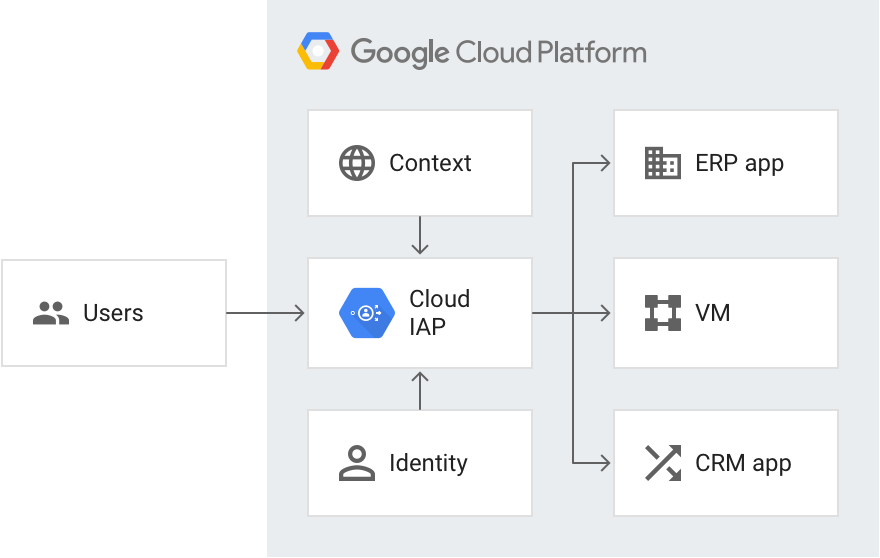
Identity-Aware Proxy (IAP):
Identity-Aware Proxy (IAP) restricts access to the application and provide user identity information to it.
Authenticating users of your web app is often necessary, and usually requires special programming in your app. For Google Cloud Platform apps you can hand those responsibilities off to the Identity-Aware Proxy service.
If you only need to restrict access to selected users there are no changes necessary to the application. Should the application need to know the user’s identity (such as for keeping user preferences server-side) Identity-Aware Proxy can provide that with minimal application code.
Identity-Aware Proxy (IAP) is a Google Cloud Platform service that intercepts web requests sent to your application, authenticates the user making the request using the Google Identity Service, and only lets the requests through if they come from a user you authorize. In addition, it can modify the request headers to include information about the authenticated user.
Steps for using IAP,
- Deploy to App Engine
- Restrict access with IAP
- Enable IAP API
- Accept the consent screen
- Create a IAP
- Disable Flex API
App Engine has its Protocol for using IAP standard and flexible environments which are optimized for different application architectures. Currently, when enabling IAP for App Engine, if the Flex API is enabled, GCP will look for a Flex Service Account.
You can further add members or examine the application files.
If there is a risk of IAP being turned off or bypassed, your app can check to make sure the identity information it receives is valid. This uses a third web request header added by IAP, called X-Goog-IAP-JWT-Assertion. The value of the header is a cryptographically signed object that also contains the user identity data.
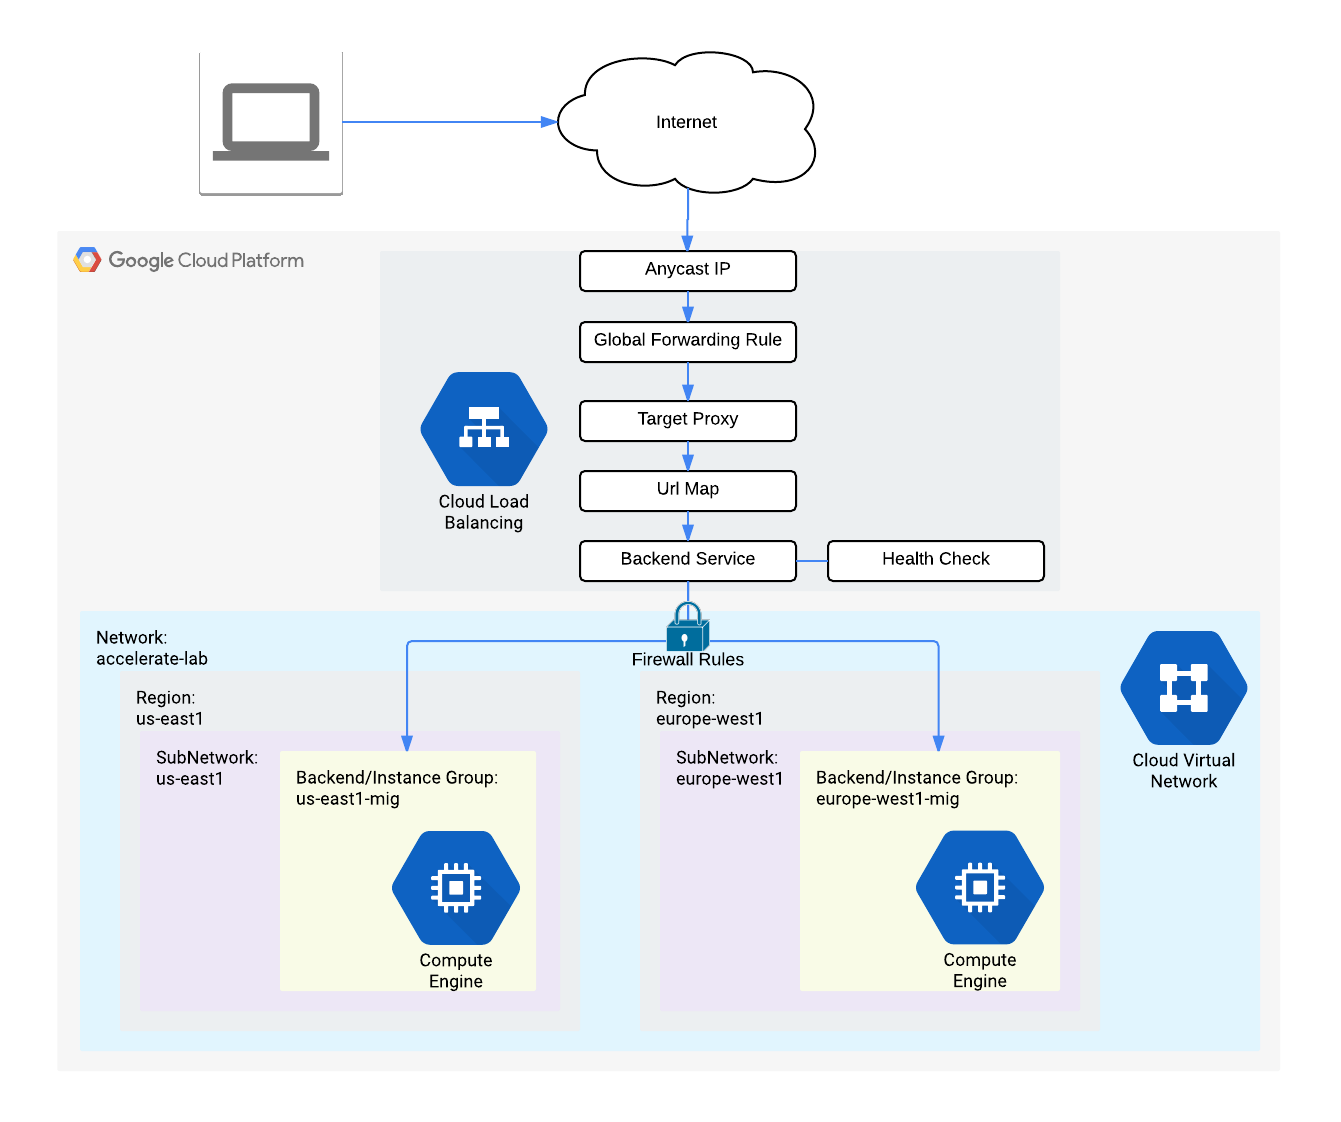
Cloud Armor:
Cloud Armor IP allow list/deny list enable you to restrict or allow access to your HTTP(S) load balancer at the edge of the Google Cloud, as close as possible to the user and to malicious traffic. This prevents malicious users or traffic from consuming resources or entering your virtual private cloud (VPC) networks.
Steps to use cloud armor,
- Configure HTTP and health check firewall rules.
- Configure instance templates and create instance groups
- Configure the HTTP load balancer
- Stress test the HTTP Load Balancing
- Verify the security policy
You can stress test the HTTP load balancing by using a VM, click on the SSH
sudo apt-get -y install siege

export LB_IP=[LB_IP_v4]

siege -c 250 http://$LB_IP
Internal Load Balancing:
Google Cloud offers Internal Load Balancing for your TCP/UDP-based traffic. Internal Load Balancing enables you to run and scale your services behind a private load balancing IP address that is accessible only to your internal virtual machine instances.
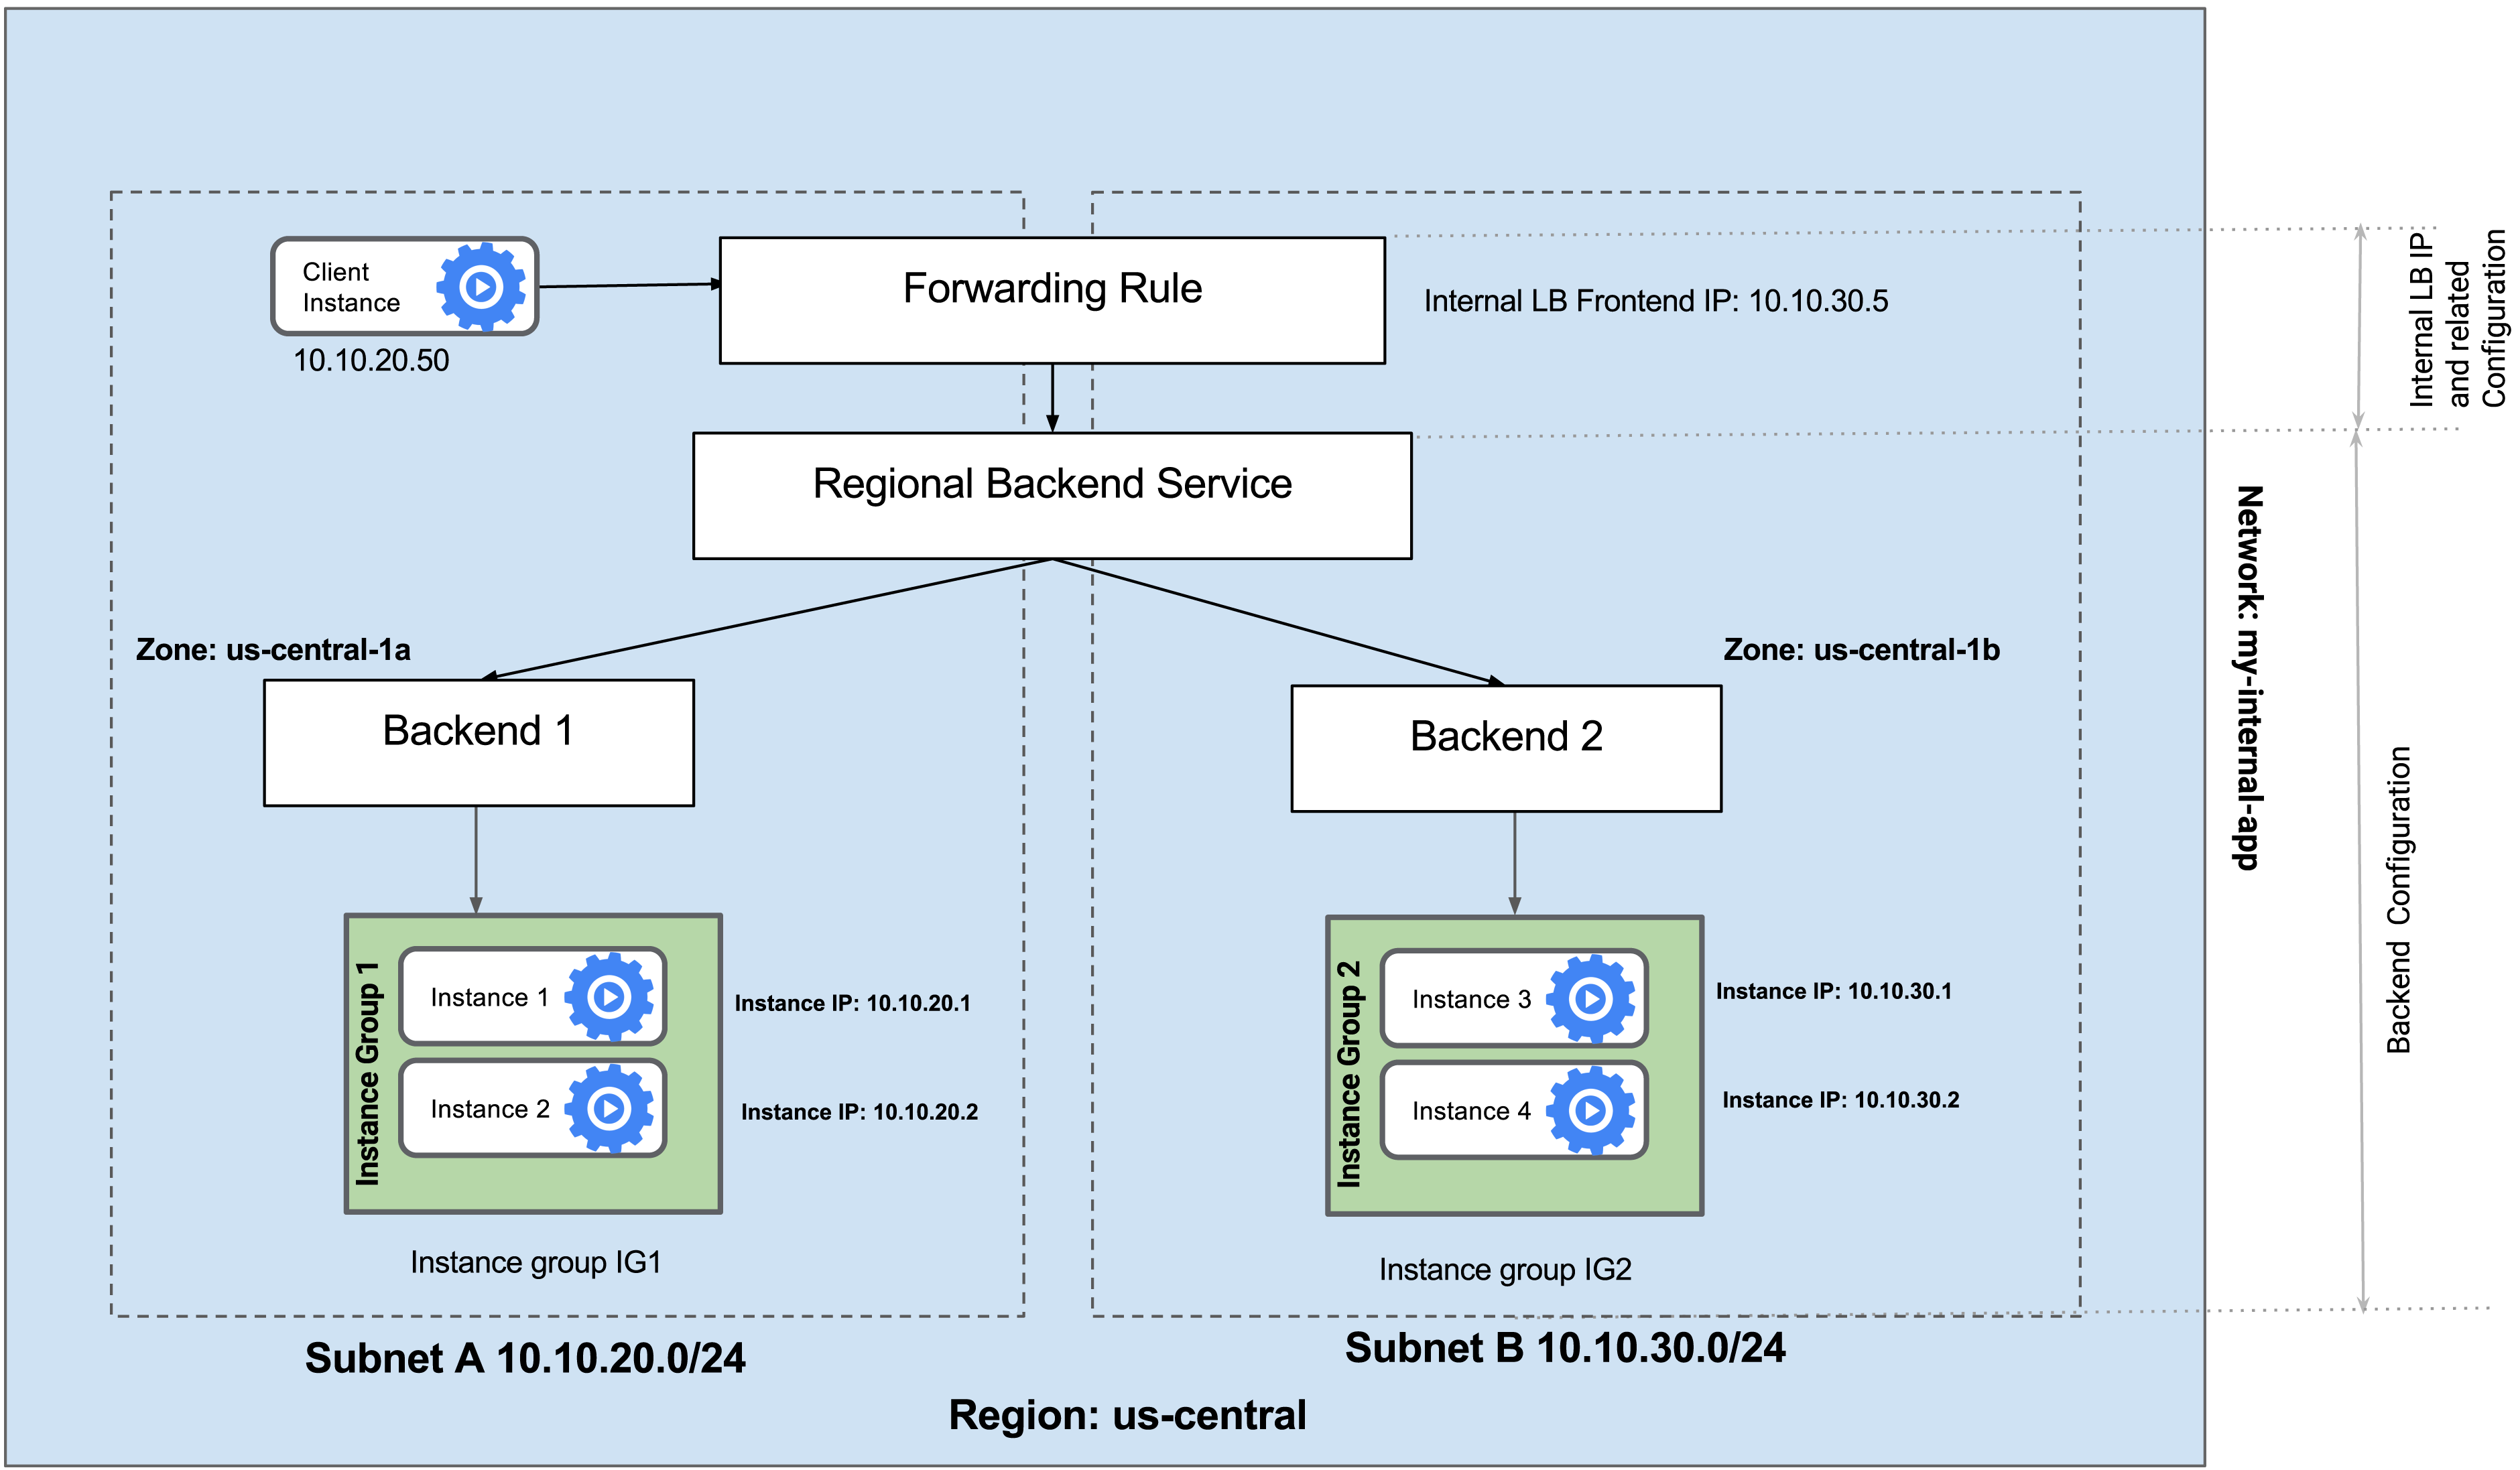
An Internal Load Balancer is a regional service. The managed instance groups will be in different zones, making your service immune to zonal failures.
Managed instance groups offer auto scaling capabilities that allow you to automatically add or remove instances from a managed instance group based on increases or decreases in load. Auto scaling helps your applications gracefully handle increases in traffic and reduces cost when the need for resources is lower. You just define the auto scaling policy and the autoscaler performs automatic scaling based on the measured load.
Configure the Internal Load Balancer to balance traffic between the two back ends. This choice requires the backends to be in a single region (us-central1) and does not allow offloading TCP processing to the Load Balancer.
For basics of Google Kubernetes Engine, Docker, Jenkins, Spinnaker and CI/CD Pipelines:
https://programmerprodigy.code.blog/2020/11/10/google-kubernetes-engine-basics/
I have mostly picked up information from Google documentation, and pictures i have used to explain concepts are not by me, I just found them online.


One thought on “Google Cloud Services basics”