Hi, so this blog focuses on the basics of Docker, Kubernetes, Managing Deployment, Canary deployments, Continuous Deployment using Jenkins or Spinnaker along with google cloud services.
Docker:
Docker is an open platform for developing, shipping, and running applications. With Docker, you can separate your applications from your infrastructure and treat your infrastructure like a managed application. Docker helps you ship code faster, test faster, deploy faster, and shorten the cycle between writing code and running code.
Docker does this by combining kernel containerization features with workflows and tooling that helps you manage and deploy your applications.
Hello World:
Open up Cloud Shell and enter the following command to run a hello world container to get started:
docker run hello-world
The docker daemon searched for the hello-world image, didn’t find the image locally, pulled the image from a public registry called Docker Hub, created a container from that image, and ran the container for you.
Command to take a look at the container image it pulled from Docker Hub:
docker images
The second time you run this, the docker daemon finds the image in your local registry and runs the container from that image. It doesn’t have to pull the image from Docker Hub.
In order to see all containers, including ones that have finished executing,
docker ps -a
The container Names are also randomly generated but can be specified with docker run --name [container-name] hello-world.

How to build a Docker Image
Let’s build a Docker image that’s based on a simple node application,
1.Create a Docker file:
This file instructs the Docker daemon on how to build your image.
- The initial line specifies the base parent image, which in this case is the official Docker image for node version 6.
- In the second, we set the working (current) directory of the container.
- In the third, we add the current directory’s contents (indicated by the
".") into the container. - Then we expose the container’s port so it can accept connections on that port and finally run the node command to start the application.
This is a simple HTTP server that listens on port 80 and returns “Hello World.”,
cat > app.js <<EOF
const http = require('http');

const hostname = '0.0.0.0';
const port = 80;

const server = http.createServer((req, res) => {
    res.statusCode = 200;
      res.setHeader('Content-Type', 'text/plain');
        res.end('Hello World\n');
});

server.listen(port, hostname, () => {
    console.log('Server running at http://%s:%s/', hostname, port);
});

process.on('SIGINT', function() {
    console.log('Caught interrupt signal and will exit');
    process.exit();
});
EOF
Now let’s build the image,
docker build -t node-app:0.1 .
The -t is to name and tag an image with the name:tag syntax. The name of the image is node-app and the tag is 0.1. The tag is highly recommended when building Docker image.
Command to look at the images you built:
docker images
Notice node is the base image and node-app is the image you built. You can’t remove node without removing node-app first. The size of the image is relatively small compared to VMs.
2.Run the image:
Command to run containers based on the image you built:
docker run -p 4000:80 --name my-app node-app:0.1
The --name flag allows you to name the container if you like. The -p instructs Docker to map the host’s port 4000 to the container’s port 80. Now you can reach the server at http://localhost:4000. Without port mapping, you would not be able to reach the container at localhost.
In another terminal, test the server :
curl http://localhost:4000
The container will run as long as the initial terminal is running. If you want the container to run in the background (not tied to the terminal’s session), you need to specify the -d flag.
3.some debugging practices:
1.You can look at the logs of a container using docker logs [container_id]. If you want to follow the log’s output as the container is running, use the -f option.
docker logs -f [container_id]
2.start an interactive Bash session inside the running container. You can use docker exec to do this.
docker exec -it [container_id] bash
3.You can examine a container’s metadata in Docker by using Docker inspect:
docker inspect [container_id]
4.Publish:
To push images to your private registry hosted by Google Container Registry, you need to tag the images with a registry name. The format is [hostname]/[project-id]/[image]:[tag].
For Google Container Registry:
[hostname]= gcr.io[project-id]= your project’s ID[image]= your image name[tag]= any string tag of your choice. If unspecified, it defaults to “latest”.
1.Find your project id:
gcloud config list project
2.Push this image to gcr. Remember to replace [project-id]:
docker push gcr.io/[project-id]/node-app:0.2
Check that the image exists in Google Container Registry by visiting the image registry in your web browser. You can navigate via the console to Navigation menu > Container Registry or visit: http://gcr.io/[project-id]/node-app.

For more information,
- https://docs.docker.com/engine/reference/builder/#known-issues-run
- https://hub.docker.com/_/node
- https://docs.docker.com/engine/reference/commandline/inspect/#examples
- https://docs.docker.com/engine/reference/commandline/exec/
Docker containers can be directly used in Kubernetes, which allows them to be run in the Kubernetes Engine with ease.
Kubernetes:
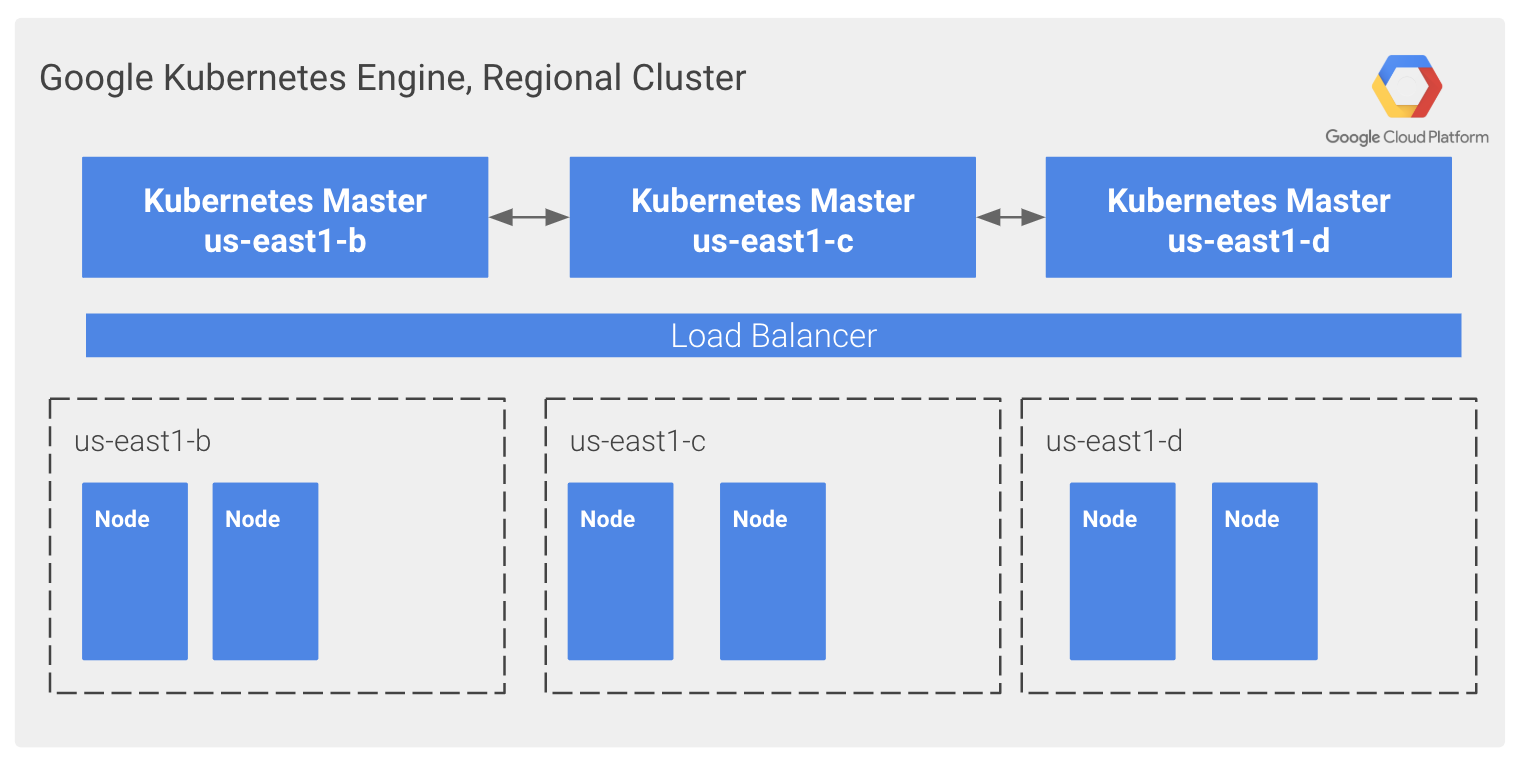
Google Kubernetes Engine provides a managed environment for deploying, managing, and scaling your containerized applications using Google infrastructure.
The Kubernetes Engine environment consists of multiple machines (specifically Compute Engine instances) grouped to form a container cluster.
For more information,
- https://cloud.google.com/kubernetes-engine/
- https://cloud.google.com/compute
- https://cloud.google.com/kubernetes-engine/docs/concepts/cluster-architecture
Cluster orchestration with Google Kubernetes Engine:
Google Kubernetes Engine (GKE) clusters are powered by the Kubernetes open-source cluster management system. Kubernetes provides the mechanisms through which you interact with your container cluster. You use Kubernetes commands and resources to deploy and manage your applications, perform administrative tasks, set policies, and monitor the health of your deployed workloads.

Kubernetes on Google Cloud:

1.Creating a Google Kubernetes Engine Cluster:
A cluster consists of at least one cluster master machine and multiple worker machines called nodes. Nodes are Compute Engine virtual machine (VM) instances that run the Kubernetes processes necessary to make them part of the cluster.
1. To create a cluster, run the following command,
gcloud container clusters create [CLUSTER-NAME]
2.To authenticate the cluster, run the following command,
gcloud container clusters get-credentials [CLUSTER-NAME]
GKE uses Kubernetes objects to create and manage your cluster’s resources. Kubernetes provides the Deployment object for deploying stateless applications like web servers.
2.Deploying a Google Kubernetes Engine Cluster:
1.To create a New Deployment hello-server from the hello-app container image, run the following kubectl create command:
kubectl create deployment hello-server --image=gcr.io/google-samples/hello-app:1.0
This Kubernetes command creates a Deployment object that represents hello-server. In this case, --image specifies a container image to deploy. The command pulls the example image from a Container Registry bucket. gcr.io/google-samples/hello-app:1.0 indicates the specific image version to pull. If a version is not specified, the latest version is used.
2.To create a Kubernetes Service, which is a Kubernetes resource that lets you expose your application to external traffic, run the following kubectl expose command:
kubectl expose deployment hello-server --type=LoadBalancer --port 8080
In this command,
--portspecifies the port that the container exposes.type="LoadBalancer"creates a Compute Engine load balancer for your container.
3.To inspect the hello-server Service, run kubectl get:
kubectl get service
4.To view the application from your web browser, open a new tab and enter the following address,
http://[EXTERNAL-IP]:8080
5.To delete the cluster, run the following command:
gcloud container clusters delete [CLUSTER-NAME]
For more information,
- https://cloud.google.com/kubernetes-engine/docs/concepts/cluster-architecture
- https://kubernetes.io/docs/concepts/workloads/controllers/deployment/
- https://kubernetes.io/docs/concepts/services-networking/service/
- https://cloud.google.com/kubernetes-engine/docs/how-to/deleting-a-cluster
Quick Kubernetes Demo
The easiest way to get started with Kubernetes is to use the kubectl create command. Use it to launch a single instance of the nginx container:
kubectl create deployment nginx --image=nginx:1.10.0
In Kubernetes, all containers run in a pod. Use the kubectl get pods command to view the running nginx container:
kubectl get pods
Once the nginx container has a Running status you can expose it outside of Kubernetes using the kubectl expose command:
kubectl expose deployment nginx --port 80 --type LoadBalancer
Behind the scenes Kubernetes created an external Load Balancer with a public IP address attached to it. Any client who hits that public IP address will be routed to the pods behind the service. In this case that would be the nginx pod.
List our services now using the kubectl get services command:
kubectl get services
Add the External IP to this command to hit the Nginx container remotely:
curl http://<External IP>:80

Pods:
At the core of Kubernetes is the Pod. Pods represent and hold a collection of one or more containers. Generally, if you have multiple containers with a hard dependency on each other, you package the containers inside a single pod.
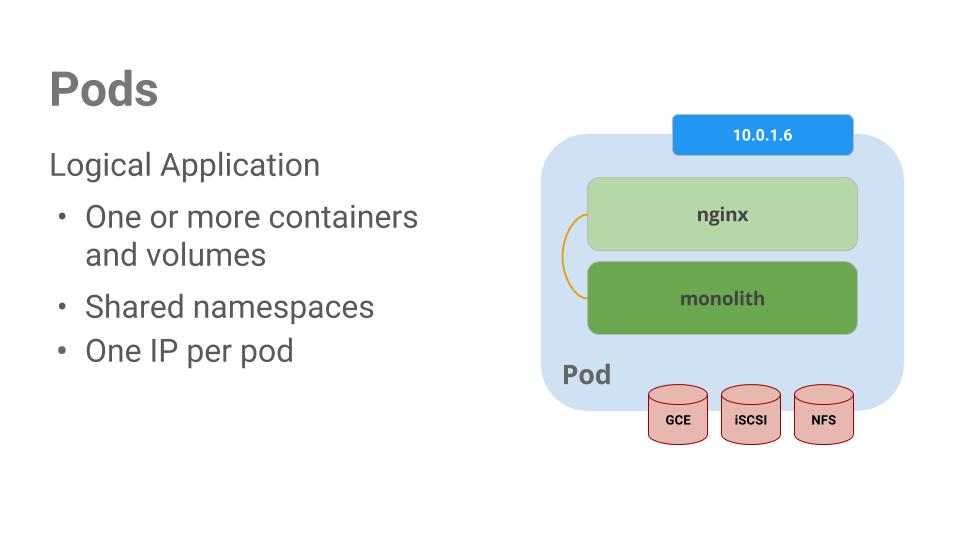
Pods also have Volumes. Volumes are data disks that live as long as the pods live, and can be used by the containers in that pod. Pods provide a shared namespace for their contents which means that the two containers inside of our example pod can communicate with each other, and they also share the attached volumes.
1.Creating Pods
1. Create the monolith pod using kubectl:
kubectl create -f pods/monolith.yaml
2.Examine your pods. Use the kubectl get pods a command to list all pods running in the default namespace:
kubectl get pods
3.Once the pod is running, use kubectl describe command to get more information about the monolith pod:
kubectl describe pods monolith
Kubernetes makes it easy to create pods by describing them in configuration files and easy to view information about them when they are running.
2.Interacting with Pods
Use the kubectl logs command to view the logs for the monolith Pod.
kubectl logs monolith
use the -f flag to get a stream of the logs happening in real-time:
Use the kubectl exec command to run an interactive shell inside the Monolith Pod. This can come in handy when you want to troubleshoot from within a container:
kubectl exec monolith --stdin --tty -c monolith /bin/sh
As you can see, interacting with pods is as easy as using the kubectl command. If you need to hit a container remotely or get a login shell, Kubernetes provides everything you need to get up and going.
3.Services:
Pods aren’t meant to be persistent. They can be stopped or started for many reasons – like failed live-ness or readiness checks – and this leads to a problem:
What happens if you want to communicate with a set of Pods? When they get restarted they might have a different IP address.
That’s where Services come in. Services provide stable endpoints for Pods.
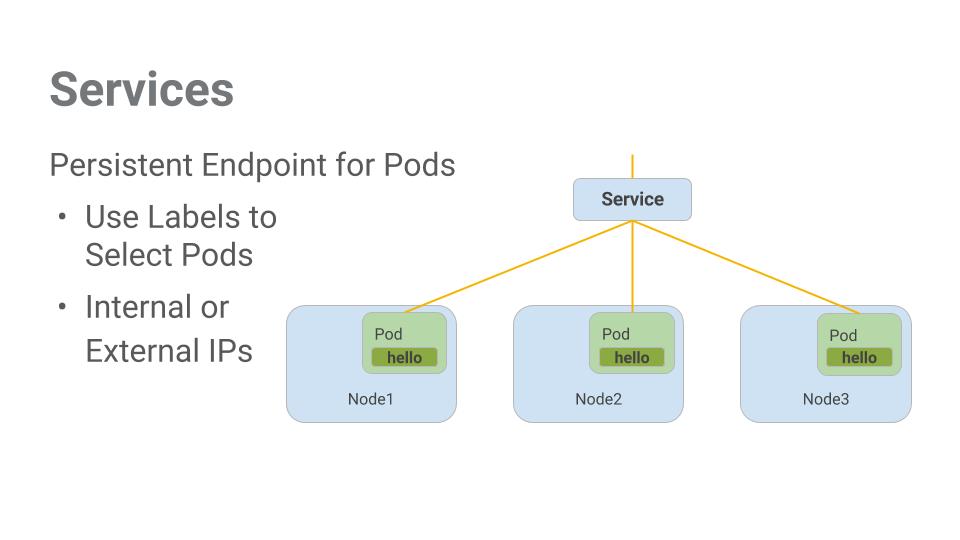
Services use labels to determine what Pods they operate on. If Pods have the correct labels, they are automatically picked up and exposed by our services.
The level of access service provides a set of pods depends on the Service’s type,
ClusterIP(internal) — the default type means that this Service is only visible inside of the cluster,NodePortgives each node in the cluster an externally accessible IP andLoadBalanceradds a load balancer from the cloud provider which forwards traffic from the service to Nodes within it.
3.1.Creating a Service:
1.Secure Pod:
1.Create the secure-monolith pods and their configuration data:
kubectl create secret generic tls-certs --from-file tls/
kubectl create configmap nginx-proxy-conf --from-file nginx/proxy.conf
kubectl create -f pods/secure-monolith.yaml
Expose the secure-monolith Pod externally. To do that, create a Kubernetes service.
2.Use the kubectl create a command to create the monolith service from the monolith service configuration file:
kubectl create -f services/monolith.yaml
3.Use the gcloud compute firewall-rules a command to allow traffic to the monolith service on the exposed node port:
gcloud compute firewall-rules create allow-monolith-nodeport \
  --allow=tcp:31000
Currently, the monolith service does not have endpoints. One way to troubleshoot an issue like this is to use the kubectl get pods command with a label query.
4.Use the kubectl label a command to add to the secure-monolith Pod. Afterwards, you can check and see that your labels have been updated.
kubectl label pods secure-monolith 'secure=enabled'
kubectl get pods secure-monolith --show-labels
5.View the list of endpoints on the monolith service:
kubectl describe services monolith | grep Endpoints
2.Testing:
Let’s test this out by hitting one of our nodes again.
gcloud compute instances list
curl -k https://<EXTERNAL_IP>:31000
3.Deploying Applications with Kubernetes:
Deployments are a declarative way to ensure that the number of Pods running is equal to the desired number of Pods, specified by the user.
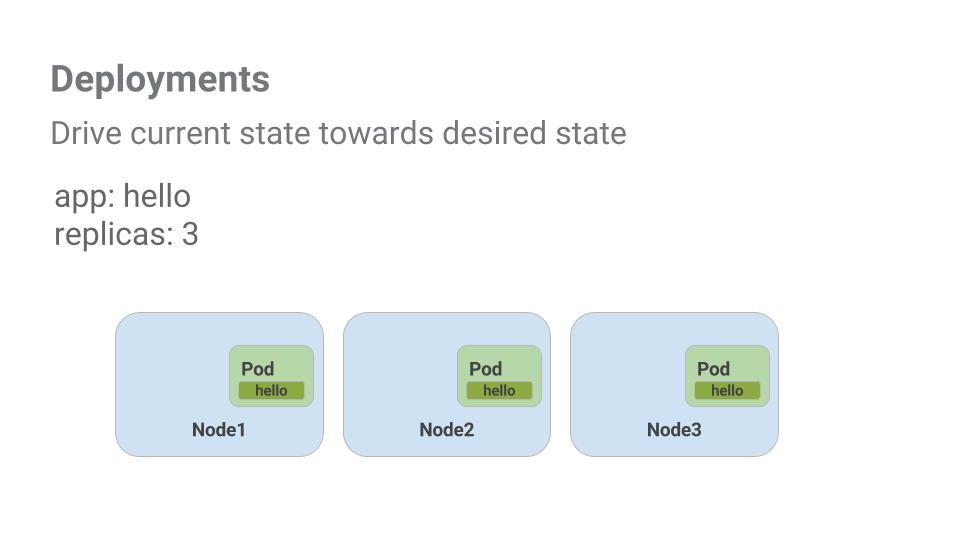
The main benefit of Deployments is in abstracting away the low-level details of managing Pods. Behind the scenes, Deployments use Replica Sets to manage to start and stopping the Pods.
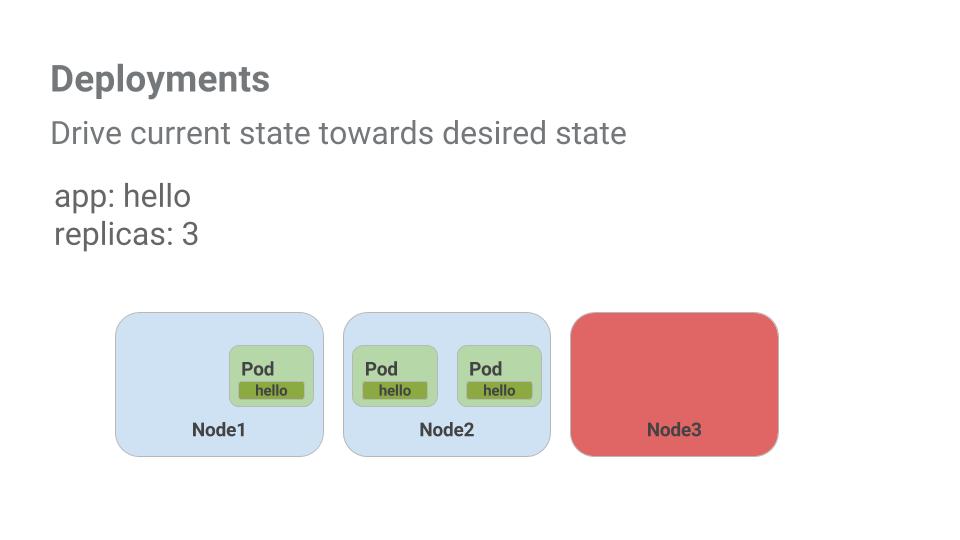
Pods are tied to the lifetime of the Node they are created on. In the example above, Node3 went down (taking a Pod with it). Instead of manually creating a new Pod and finding a Node for it, your Deployment created a new Pod and started it on Node2.
4.Creating Deployments:
We’re going to break the monolith app into three separate pieces:
- auth – Generates JWT tokens for authenticated users.
- hello – Greet authenticated users.
- frontend – Routes traffic to the auth and hello services.
You should be able to interact with the microservices just like with Monolith only now each piece will be able to be scaled and deployed, independently!
When you run the kubectl create command to create the auth deployment it will make one pod that conforms to the data in the Deployment manifest. This means you can scale the number of Pods by changing the number specified in the Replicas field.
1.create your deployment object:
kubectl create -f deployments/auth.yaml
2.create a service for your auth deployment.
kubectl create -f services/auth.yaml
3.Create and expose the hello deployment:
kubectl create -f deployments/hello.yaml
kubectl create -f services/hello.yaml
4.Create and expose the frontend Deployment.
kubectl create configmap nginx-frontend-conf --from-file=nginx/frontend.conf
kubectl create -f deployments/frontend.yaml
kubectl create -f services/frontend.yaml
There is one more step to creating the frontend because you need to store some configuration data with the container.
Interact with the frontend by grabbing it’s External IP and then curling to it:
kubectl get services frontend
curl -k https://<EXTERNAL-IP>
For more information,
- https://kubernetes.io/docs/concepts/workloads/pods/
- http://kubernetes.io/docs/user-guide/services/
- http://kubernetes.io/docs/user-guide/deployments/#what-is-a-deployment

Managing Deployments Using Kubernetes Engine:
1.learn about the deployment object
Take a look at the Deployment object.
kubectl explain deployment
We can also see all of the fields using the --recursive option.
You can use the explain command as you go through the lab to help you understand the structure of a Deployment object and understand what the individual fields do.
kubectl explain deployment.metadata.name
2.Create a deployment:
When you run the kubectl create command to create the auth deployment, it will make one pod that conforms to the data in the Deployment manifest. This means we can scale the number of Pods by changing the number specified in the replicas field.
1.create your deployment object using kubectl create:
kubectl create -f deployments/auth.yaml
2.verify that it was created.
kubectl get deployments
3.Once the deployment is created, Kubernetes will create a ReplicaSet for the Deployment. We can verify that a ReplicaSet was created for our Deployment:
kubectl get replicasets
4.Finally, we can view the Pods that were created as part of our Deployment. The single Pod is created by the Kubernetes when the ReplicaSet is created
kubectl get pods
5.It’s time to create a service for our auth deployment. You’ve already seen service manifest files, so we won’t go into the details here. Use the kubectl create command to create the auth service.
kubectl create -f services/auth.yaml
6.create and expose the frontend Deployment.
kubectl create secret generic tls-certs --from-file tls/
kubectl create configmap nginx-frontend-conf --from-file=nginx/frontend.conf
kubectl create -f deployments/frontend.yaml
kubectl create -f services/frontend.yaml
Interact with the frontend by grabbing its external IP and then curling to it.
3.Scale a Deployment:
Now that we have a Deployment created, we can scale it. Do this by updating the spec.replicas field. After the Deployment is updated, Kubernetes will automatically update the associated ReplicaSet and start new Pods to make the total number of Pods equal 5.
kubectl explain deployment.spec.replicas
The replicas field can be most easily updated using the kubectl scale command:
kubectl scale deployment hello --replicas=5
After the Deployment is updated, Kubernetes will automatically update the associated ReplicaSet and start new Pods to make the total number of Pods equal 5.

One thought on “Google Kubernetes Engine basics”