AWS Identity Access Management (IAM):
An IAM role is an IAM entity that defines a set of permissions for making AWS service requests. IAM roles allow you to delegate access with defined permissions to trusted entities without having to share long-term access keys. You can use an IAM role to delegate access to IAM users – managed within your account – to IAM users under a different AWS account, or to an AWS service like EC2.
An IAM user has permanent, long-term credentials, and is used to directly interact with AWS services. A group is primarily a management convenience to manage the same set of permissions for a set of IAM users.
For troubleshooting purposes, keep in mind that there’s an implicit denial for all actions. IAM policies are evaluated along with the service’s resource-based policies. When a policy of any type grants access without explicitly denying it, the action is allowed. Meaning if I have anywhere in the policy, an explicit deny statement, that will override any allow statement.

AWS lambda :
AWS Lambda is a serverless compute service. It lets you run your code without provisioning or managing servers. You pay only for the compute time you consume. That means no charge when your code is not running.
1.Traditional deployment:
- I’ve got a VPC. And that provides me logical isolation at the network level.
- I have an internet gateway, which allows inbound and outbound traffic.
- I have an ELB, which distributes the traffic across two Availability Zones.
- I’ve chosen two for high availability and fault tolerance.
- I have two EC2 instances. The ELB will distribute the load to those.
- Traffic comes inbound through the internet gateway to the ELB, and then is distributed to the EC2 instances.
2.A different way:
- API Gateway is going to receive traffic from the user.
- It will send that traffic into Lambda,
- Lambda will be replying back with that traffic all the way down to the user.
With Lambda, you can run code for virtually any type of application or back end service, all with zero administration. Just upload your code, and Lambda takes care of everything required to run and scale your code with high availability. With AWS Lambda, you pay only for the requests served and the compute time required to run your code for each of those requests. Billing is metered in increments of 100 milliseconds, making it cost-effective and easy to scale automatically from a few requests to thousands per second.
let’s go through a flow of creating a lambda function
1.It needs you to pick a programming language. As of today, Lambda natively supports six programming languages: Node.js, Python, Java, C#, Ruby, and Go. Sometimes those native runtime aren’t enough because you may have a tool that you don’t want to rewrite that’s in C++, or maybe because your expertise isn’t PHP. That’s why it’s possible to use your own runtime, but you will need to develop that piece as well.
2.Next step required to create a Lambda function is to upload our code. This can be done in three ways,
- You can use the inline code editor,
- upload your own ZIP file containing your code,
- to store that ZIP file in S3 and point Lambda to that file.
Depending on what your code does, you may require Lambda to access other AWS services. For that, you will need to specify an Identity and Access Management role. That role is required to do logging, as you may need to troubleshoot the execution of your Lambda function. To do so, you can just output to the console in Node.js and Python. Anything that is sent there will automatically be sent to the CloudWatch Logs service, which is just a service to collect logs.
3.However, a Lambda function on its own doesn’t do much. It needs to be executed. We call that triggers. There are many AWS services that can trigger a Lambda function,
For example, a Lambda function can be triggered by S3 when a new object gets uploaded. So if you wanted to transform a picture that is uploaded to an S3 bucket and flip it upside down towards another S3 bucket.

There are a few ways to do the above task,
1.Sever world way:
- You will have to pull the S3 bucket to know if a new image has been uploaded every once in a while.
- I’ll need to poll that S3 bucket constantly until the image is there.
- And then once I’m ready, I can then send that towards the other S3 bucket.
2.AWS lambda way:
- You can configure S3 to trigger the Lambda function as soon as that image is uploaded.
- S3 needs to be allowed to trigger your Lambda function. As by default, nothing can trigger it.
- To do so, you use a function policy referencing the S3 bucket, if we use the AWS Management Console, that policy can be automatically created,
When your Lambda function gets executed, Lambda – the service – needs to know what piece of your code it needs to execute. That is the entry point for your code. In the Lambda world, that’s called a “handler.” This tells Lambda in which file or class the function to execute is, as well as its name.
Lambda will use that handler to execute your Lambda from the trigger it received, but your code probably needs to receive some more information about what just triggered it. That information is passed to the handler via what we call an “event payload.”
If we go back to our example of a picture uploaded to S3 to be transformed, that event payload will contain the bucket name and the object key of the blue triangle, which Lambda can now use to know which one of the objects from that input S3 bucket to transform.

Those are the two types of invocation of Lambda,
- Asynchronous invocation : When a service like S3 invokes the Lambda function, there is no need for S3 to get return data from the function. It really doesn’t care about what Lambda does.
- Synchronous invocation : If we take another example where we will have API Gateway that sends a request to Lambda for a REST API call, API Gateway is really interested in the response from Lambda to be able to send it back towards the user.
While the function is running and transforming that image from S3, RAM and CPU are used. How are those allocated in Lambda? Well, you don’t allocate CPU power, you only allocate RAM. However, the more RAM you provide, the more CPU power your Lambda function will also have. As of today, that RAM allocation can go from 128 MB to 3 GB.This all depends on the complexity of your Lambda function code, you will need to execute some tests to figure out which amount of RAM is better here, which is the lower cost.
Now a limitation of Lambda is that a single execution can only run for maximum of 15 minutes. After 15 minutes, Amazon will yank the carpet under your code and you will now have no choice but to stop abruptly. If you do need to run for more than that, you are probably looking for another type of compute. Staying in the serverless world, you can take a look at AWS Fargate, or you could go to an architecture. Since you paid per 100 milliseconds of your code running and Lambda has a maximum timeout of 15 minutes, what happens if your code was to go in an infinite loop? Will you be charged for all the way to those 15 minutes? The answer here is: Yes, you will. However, there’s a timeout that is configurable for your Lambda function to prevent this kind of behavior.
Well, every time that I change my Lambda function, a brand new container gets deployed, a brand new Lambda function gets invoked in there, which means there will be a brand new log stream that gets created.Lambda is using console.log, or any print output in Python, for example, will be sent into CloudWatch Logs, and you can go in and review them inside of CloudWatch Logs.
API Gateway sends its data into Lambda via automatically packaging everything up into a JSON payload, the name parameter may not be passed the same way as how I’ve done my test in the first place. In fact, we’re going to need to go and modify our code.

Amazon Dynamo DB :
It’s important to understand the foundational concepts of DynamoDB, such as partition keys and sort keys, as well as local and global secondary indexes.

In DynamoDB, we call a set of information “tables.” A table is a collection of items, and each item is a collection of attributes.
- the partition key, which is a simple primary key, composed of one attribute.
- next to the partition key is a sort key.
- When a partition and a sort key exist in a table, it is referred to as a “composite primary key” and is composed of two attributes.
- So, while this table isn’t super useful yet, it will become useful when we add attributes.

But now, we need to figure out how this data will be queried to derive meaningful insights. Let’s talk indexes. A “secondary index” is a data structure that contains a subset of attributes from a table, along with an alternate key to support query operations. A table can have multiple secondary indexes, which give you application access to many different query patterns.
- Local secondary index. That’s an index that has the same partition key as the base table, but a different sort key. So, an example of a query that we could use on a local secondary index, A “local secondary index” is an index that has the same partition key as the base table, but a different sort key.
- A “global secondary index” is an index that has a partition key and a sort key that can be different from those based on the base table.
By the way, if it’s a local secondary index, there is only one and only opportunity to add it. Provision throughput is represented in units of read and write capacity. There are several options to manage this.
- First is the ability for you to provision throughput, again, based on read and write capacity units.
- Be sure to use our good friend Amazon CloudWatch to help guide you with your decision to increase or decrease.
- You can use the on-demand mode for DynamoDB. This will help you get up and running quickly without much concern to performance configurations.
- Auto scaling. Auto scaling is a way for you to run a more forgiving type of DynamoDB environment.
- As far as performance goes, these tools are largely automated, since it’s a managed service, which is really nice for you.
Extending our application :
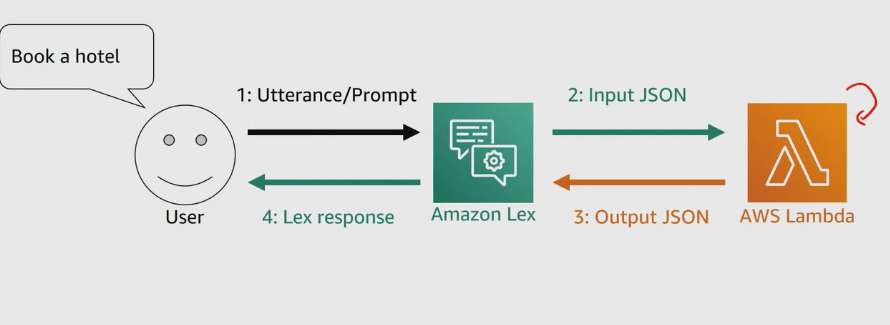
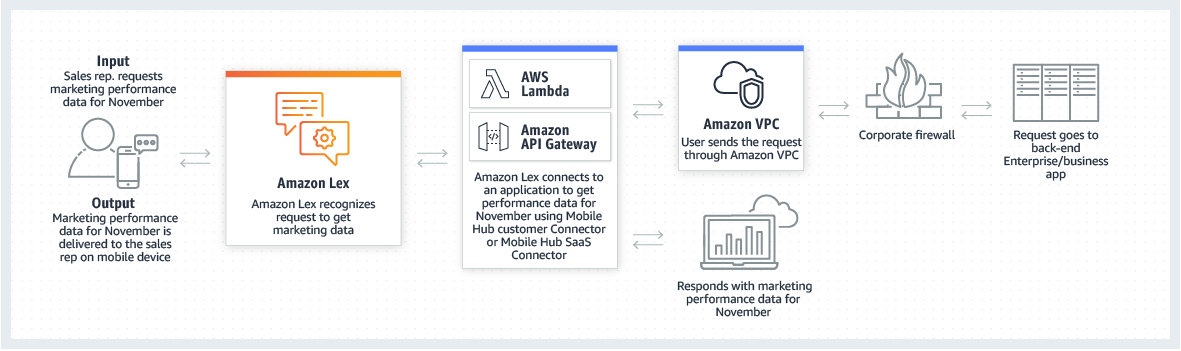
Amazon Lex :
When we just had Amazon lex we didn’t have a validation perspective of slots, this is solved by AWS Lambda function, it validates each slot or response sent to Lex by the User.

When the intent in configured to invoke a Lambda function as initialization and validation code hook, Amazon Lex invokes the specified Lambda function on each user input after Amazon Lex understands the intent. If the intent is not clear, Amazon Lex can’t invoke the Lambda function. Why would we want a Lambda function invoked for every single utterance or prompt? Validation, of course! But don’t we already do validations in the case where we select Restrict to Slot values and Synonyms in a slot type? Well, yes, but sometimes we don’t control the slot because it’s a built-in slot. As you can see, the Amazon ones.
To add validation, we first need to create a Lambda function. I will be using a blueprint, as the Lex team was nice enough to give us a template for the Lex sample bot that we all need to use. In the Lex console, I will modify both intents to use this Lambda function for initialization and validation, as well as fulfillment.
Session attributes : They contain application-specific information that is passed between a bot and the client application during a session. Amazon Lex passes session attributes to all Lambda functions configured for a bot. If a Lambda function adds or updates session attributes, Amazon Lex passes the new information back to the client application. Session attributes can also be used to add more information in the prompts to the user,
You may also be wondering what constitutes a user to Lex. Well, when a request is sent to Lex, a user ID is also passed, and that’s what Lex will use as its key to associate all of the session’s attributes until the timeout is reached.
We can also integrate various channels into our AWS lex chatbot, On top of easily integrating Lex into web UI,or in your mobile application via the AWS mobile SDK, you can integrate your bot with Facebook Messenger, Kik, Slack, and Twilio SMS.
Let’s see how to do that with Facebook Messenger. First, we need a name. I’ll input ServerlessChatBot.

- Then, I need to fill which alias I want to associate to my Facebook page. .
- Then, I need to select which Key Management Service key I want to use to encrypt all of the data.
- I need to input a verify token that I will use, reuse it in fact, on the Facebook developer portal. For the other two parameters, I need to go on Facebook to get those.
- First, I will create a Facebook page. I hit the Create button and select Page. I will use Community or Public Figure by clicking the Get Started button.
- Now that I have a page, I will need to jump over to the developer portal of Facebook,
- I’ll create a brand new application by clicking on the My Apps menu at the top, and clicking Add New App. For the Display Name, I’m going to use Serverlesschatbot.
- Going under the Settings, under Basic, I am going to find my App Secret. I’ll need to click that Show button right here to display it. I’ll take this App Secret, go back to Amazon Lex, and enter it as my App Secret input here.
- Next, I’ll go back to my developer portal in Facebook. I will go under the Products page, and I will add Messenger, and I’ll set up Messenger here. I will go under the Token Generation, and I’ll select the Facebook page I created called Serverlesschatbot. I’ll continue as myself.
- Now, this gives me a page access token that I’ll copy and paste back onto my Lex console.
- I will get an Endpoint URL. I will copy this Endpoint URL. So, still under the developer portal, under the setting of Messenger, I’ll go under Webhooks. I’ll click the Setup Webhooks button, where I will input this Endpoint URL that I have just copied from the Lex endpoint.
- Then, I need my Verify Token. If you remember. Then I need to specify Subscription Fields – those are messages, messaging_post backs, and messaging_options. I’ll click Verify and Save. And it seems like it worked.
- The next step is to subscribe, under my Webhooks, subscribe my Serverlesschatbot page to this application
- In my Facebook page, I will add a button, by clicking the Add button. I’ll select Contact you, send the message, click Next, select Messenger, and hit Finish.
- Now, this Send Message button allows us to send a message to the chatbot.
- My chatbot is now available via my Facebook page.
Examples and details about how to do this can be found in the Lex Documentation.
Previous blog in the series was about migrating to cloud, https://programmerprodigy.code.blog/2020/06/05/aws-fundamentals-migrating-to-the-cloud/

I’m not that much of a online reader to be honest but your blogs really nice, keep it up! I’ll go ahead and bookmark your website to come back later on. Cheers
LikeLiked by 1 person