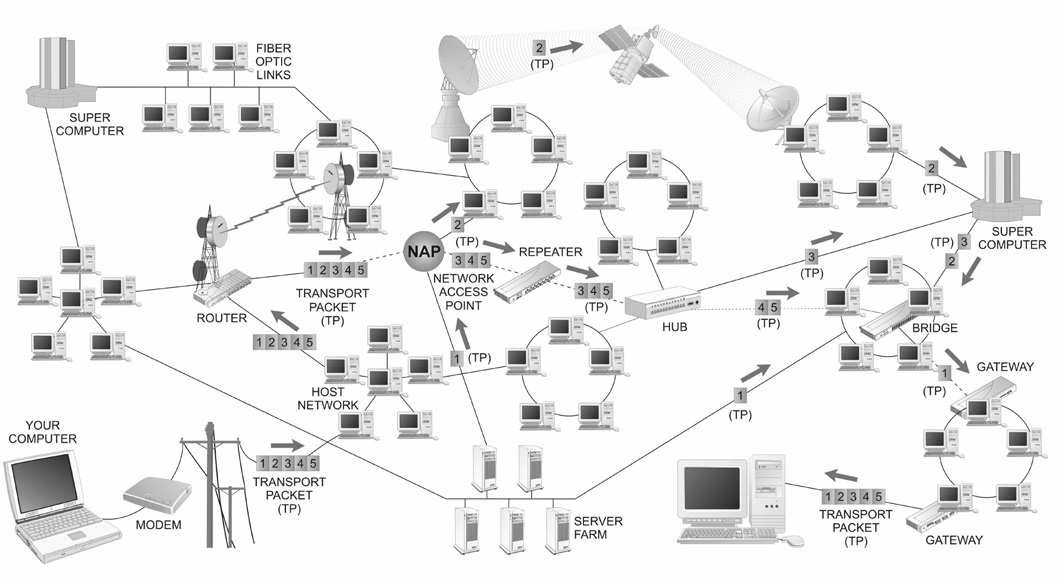
Q.How do you send and receive data ?
- You type the URL,
- Your computer then sends this request as a packet which includes the IP address of the website you want,
- Request sent through wires or satellite which link to wires using your ISP(Internet Service Provider),
- Your ISP will then re-route the request to the appropriate sever location using the IP address as the guide,
- Once your request reaches the sever, it can send back the website you asked for,
- However a full website with content is too big to send as a single packet of data,
- Sever sends pack the data in various packets,
- Packets assemble together in particular order when they reach you.
Q.What is Full Stack ?
Full Stack Means a collection of,
1.Front-End is what you see as a user on the website
- Hyper Text Markup Language(HTML) – basics of UI,
- Cascading Style Sheets(CSS) – additional UI,
- Java Script(JS) – functionality in UI.
2.Back end is the technology used to actually decide what to show you on the Front-End, it has 3 components
- The language,
- The Framework,
- The data base.

Front-End
1.HTML :
First of all we need to take care of opening tag(<O_tag>) and closing tag (</C_tag>)
- head contains Meta data or the linking to the other HTML or CSS files.
- title tag contains the title of the page or the name of the page, take a look at this tab’s name.
- body : actual content of the HTML file, the data we want to show.
<!– Anything between this is a comment –>
1.Basics of HTML Tags :
1.heading tag: It contains text which is heading, and basically bold. There are 6 types of headings,
<h1,h2,h3,h4,h5,h6>
This is heading
 </h1,h2,h3,h4,h5,h6>
2.paragraph tag: It contains text which is a paragraph or content, also remember each tag has its own blocks. So you can’t attach a a current block to the previous block.
<p>This is a line,
It continues to the second line
Further continues</p>
3.List : HTML has two types of lists, it can be either ordered list or unordered list
- Ordered list : It contains number 1,2,3,etc and the tag for it is
<!-- ol is the tag to start the list and li is for a line -->
<ol>
            <li>First </li>
            <li>Second</li>
            <li>Third</li>
</ol>
2.Unordered list : It contains bullet points 1,2,3,etc and the tag for it is
<!-- ul is the tag to start the list and li is for a line -->
<ul>
            <li>First </li>
            <li>Second</li>
            <li>Third</li>
</ul>
You can also nest ordered list inside Unordered list and vice-versa.
4. Divs and Spans :Used to group HTML tags so we can efficiently apply our CSS to them.
<!-- div is for an entire block and Span is for line wise, for particular lines -->
<div class="">
            <h1>Group One</h1>
            <p>Yolo,<span>you only line once </span>  </p>
        </div>
5.Image : Do have the image in the same folder or have the path to the image copied in the clipboard.
<!-- alt is used to display text if pic is not found -->
<img src="Ency&Decy.png" alt="There is no pic ">
6.Link for a new page : Do have the new page.html in the same folder or have the path to the new page.html copied in the clipboard.
<!-- Click Me is used as a clickable text to redirect to new page or https -->
<a  href="newpage.html">Click me</a>

2.Intermediate of HTML Tags :
1.Table : To form a table in HTML, things you need to use are
- <table> : to declare the starting of a table
- <thread> : where column names go
- <th> :Columns
- <tr> : where rows go
- <td> :Rows
<!-- border is used to give table a border -->
<table border="1">
            <thead>
                <th>country</th>
                <th>GDP</th>
            </thead>
            <tr>
                <td>USA</td>
                <td>18,561,930</td>
            </tr>
 </table>
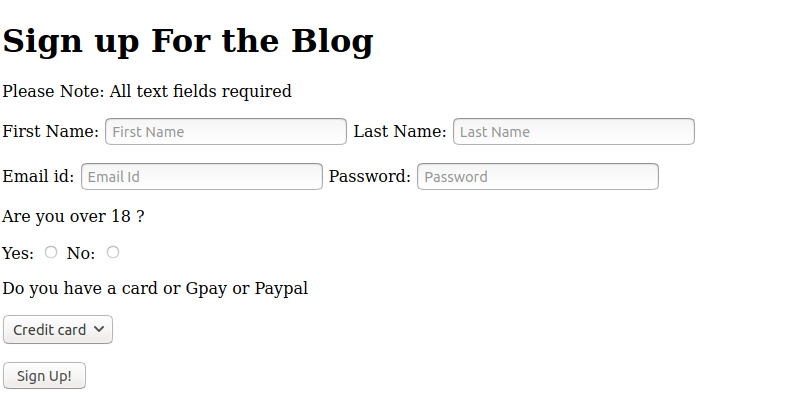
2.Forms : It mainly deals with input types and actions based on it.
For input you have various types of parameters,
- type : type of input required
- name : the name of the input storage type
- value : default value
- id : unique value
- place holder : faint text for the input
- required : You need to make sure this field is filled
How to connect these inputs ?
Actions : action performed by clicking on a button type
 <form action="https://www.w3schools.com/" method="get">
        <h1> Log in</h1>
        <h2>Enter email</h2>
        <input type="email"name="useremail"value="email">
        <input type="submit" name="" value="Submit">
    </form>
Labels : for multiple text box, you can label each block to display in the same line.
 <label for="fn">First Name:</label>
            <input id='fn' type="text" name="" placeholder="First Name" value="" required>

            <label for="ln">Last Name:</label>
            <input id='ln' type="text" name="" placeholder="Last Name" value="" required>
Now if you have a static website which means no data base connected, then whenever you click a submit button then see the value of the parameter in the URL.
3.Radio Buttons : It’s basically a round check box, Now how do we link two radio buttons, so that if one is true the other one is false.
rgb stands for red green blue, and rgba stands for red green blue alpha(number between 0 to 1).To solve this issue, we name the both radio buttons same.
<p>Are you over 18 ?</p>

            <label for="y">Yes:</label>
            <input id='y' type="radio" name="over"value="yes">

            <label for="n">No:</label>
            <input id='n' type="radio" name="over"value="no">
4.Drop down Menu : It’s basically a custom drop down menu, to customize value of stars to text.
 <p>Do you have a card or Gpay or Paypal</p>

            <select name="payement">

                <option value="cc">Credit card</option>
                <option value="gc">Google pay</option>
                <option value="pp">Paypal</option>
            </select>
5.Text Area : It used to input multiple lines as input
<textarea name="Ty" id="" cols="30" rows="10"></textarea>
Now if you apply HTML, you can get a form.
3.Cascading Style Sheets(CSS) :
The General way to add style to your HTML websites is done by using CSS, So you have the main functioning code in HTML and styling is done in CSS.
While you can define styling inside of an HTML file, it is much more common (and better) to create a separate .CSS file and then link it to the HTML file.
1.Basics of CSS Styling
1.linking to the CSS file from HTML file : Now if the file is present in the same working directory, then you can just right the name of the file. Otherwise you will have to specify a path to the particular CSS file.
<link rel="stylesheet" href="part1_master.css">
<!-- here part1_master.css is present in the same working directory-->
/* Anything inside this will be a comment in CSS files */
general format of CSS :
selected tag{
  property:value;
}
2.Color property : you can use color picker feature, just search color picker in google.
h1{
    color: red;/* you can send color by name, rgb or rgba or hex value of color.
}
rgb stands for red green blue, and rgba stands for red green blue alpha(number between 0 to 1).
3.border : requires three parameters border width, border color and border style.
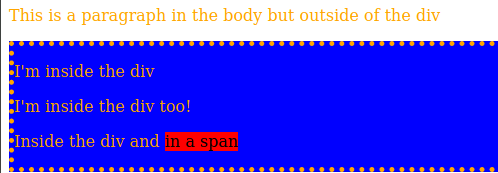
4. div and span tags usage : Using div and span tags we can work with particular div and span tags in CSS files, So as to affect the particular content with div and span tags.
HTML file,
<div >
      <p>I'm inside the div</p>
      <p>I'm inside the div too!</p>
      <p>Inside the div and <span>in a span</span></p>
</div>
CSS file,
div{
  background: blue;
  border: orange;
  border-width: thick; /* 10 px */
  border-style: dotted;

  }

span{
  background: red;
  color: black;
}
5.Using div class : If you want to work with a particular div tag, then you can give it a class name. To access the class name in CSS file.
HTML file,
<div class="firstDiv">
      <p>I'm inside the first div</p>
    </div>

    <div class="secondDiv">
      <p>I'm inside the second Div</p>
    </div>

    <p id='singledout'>ids must be unique!</p>
CSS file,
.firstDiv{
  color: blue;
}

.secondDiv{
  background-color: gray;
}

/* Use an id to single out html elements*/

/* id selectors use a hashtag # */
#singledout{
  color: red;
  text-decoration: underline;
}
What can you do with these tags and styling ?

2.Intermediate of CSS Styling :
1.Font : we have to keep in mind that not every OS has every font, we have default fonts such as “Arial”.
h1{
    font-family: "Arial";
}
An em value is a dynamic way of sizing things, with respect to other tags.
p{
  font-size: 10px;
}

h1{
  font-size: 2.0em;/* It will be twice the size of p.
}
Now you can either look for default font or linked fonts from a website.
- For default fonts, https://www.cssfontstack.com/
- For linked fonts, https://fonts.google.com/
HTML file,
<link href="https://fonts.googleapis.com/css2?family=Metal+Mania&display=swap" rel="stylesheet">
CSS file,
p{
        font-family: 'Metal Mania', cursive;
}
2.Box model : For space between margin, border and content.

- width of the border
- margin of the border, with parameters(top,right,bottom, left)
- padding, space between content and border.
- text-align, to align the text.
#top{
  border: 4px solid blue;

  width: 25%;

  /*Top,Right, Bottom, Left*/
  margin: 10px 20px 100px 400px;

  text-align: center;
  padding: 200px;

}

Now when you integrate all this knowledge of HTML + CSS , you get a complete UI basic web page.


Amazingly explained!!
LikeLike