What is Jenkins?
Jenkins is an open-source automation server that lets you flexibly orchestrate your build, test, and deployment pipelines. Jenkins allows developers to iterate quickly on projects without worrying about overhead issues that can stem from continuous delivery.
For more information,
- https://cloud.google.com/solutions/jenkins-on-kubernetes-engine
- https://plugins.jenkins.io/kubernetes/
Provisioning Jenkins
1.Creating a Kubernetes cluster
1.Provision a Kubernetes cluster:
gcloud container clusters create jenkins-cd \
--num-nodes 2 \
--machine-type n1-standard-2 \
--scopes "https://www.googleapis.com/auth/source.read_write,cloud-platform"
Verify that your cluster is running :
gcloud container clusters list
Now, get the credentials for your cluster:
gcloud container clusters get-credentials jenkins-cd
Kubernetes Engine uses these credentials to access your newly provisioned cluster—confirm that you can connect to it by running the following command:
kubectl cluster-info
Setup Helm:
You can use Helm to install Jenkins from the Charts repository. Helm is a package manager that makes it easy to configure and deploy Kubernetes applications. Once you have Jenkins installed, you’ll be able to set up your CI/CD pipeline.
- Add Helm’s stable chart repo:
helm repo add stable https://kubernetes-charts.storage.googleapis.com/
- Ensure the repo is up to date:
helm repo update
Configure and Install Jenkins
- Use the Helm CLI to deploy the chart with your configuration settings.
helm install cd stable/jenkins -f jenkins/values.yaml --version 1.2.2 --wait
- Once that command completes ensure the Jenkins pod goes to the
Runningstate and the container is in the READY state:
kubectl get pods
- Configure the Jenkins service account to be able to deploy to the cluster.
kubectl create clusterrolebinding jenkins-deploy --clusterrole=cluster-admin --serviceaccount=default:cd-jenkins
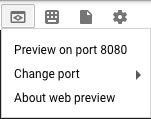
- Run the following command to setup port forwarding to the Jenkins UI from the Cloud Shell
export POD_NAME=$(kubectl get pods --namespace default -l "app.kubernetes.io/component=jenkins-master" -l "app.kubernetes.io/instance=cd" -o jsonpath="{.items[0].metadata.name}")
kubectl port-forward $POD_NAME 8080:8080 >> /dev/null &
- Now, check that the Jenkins Service was created properly:
kubectl get svc
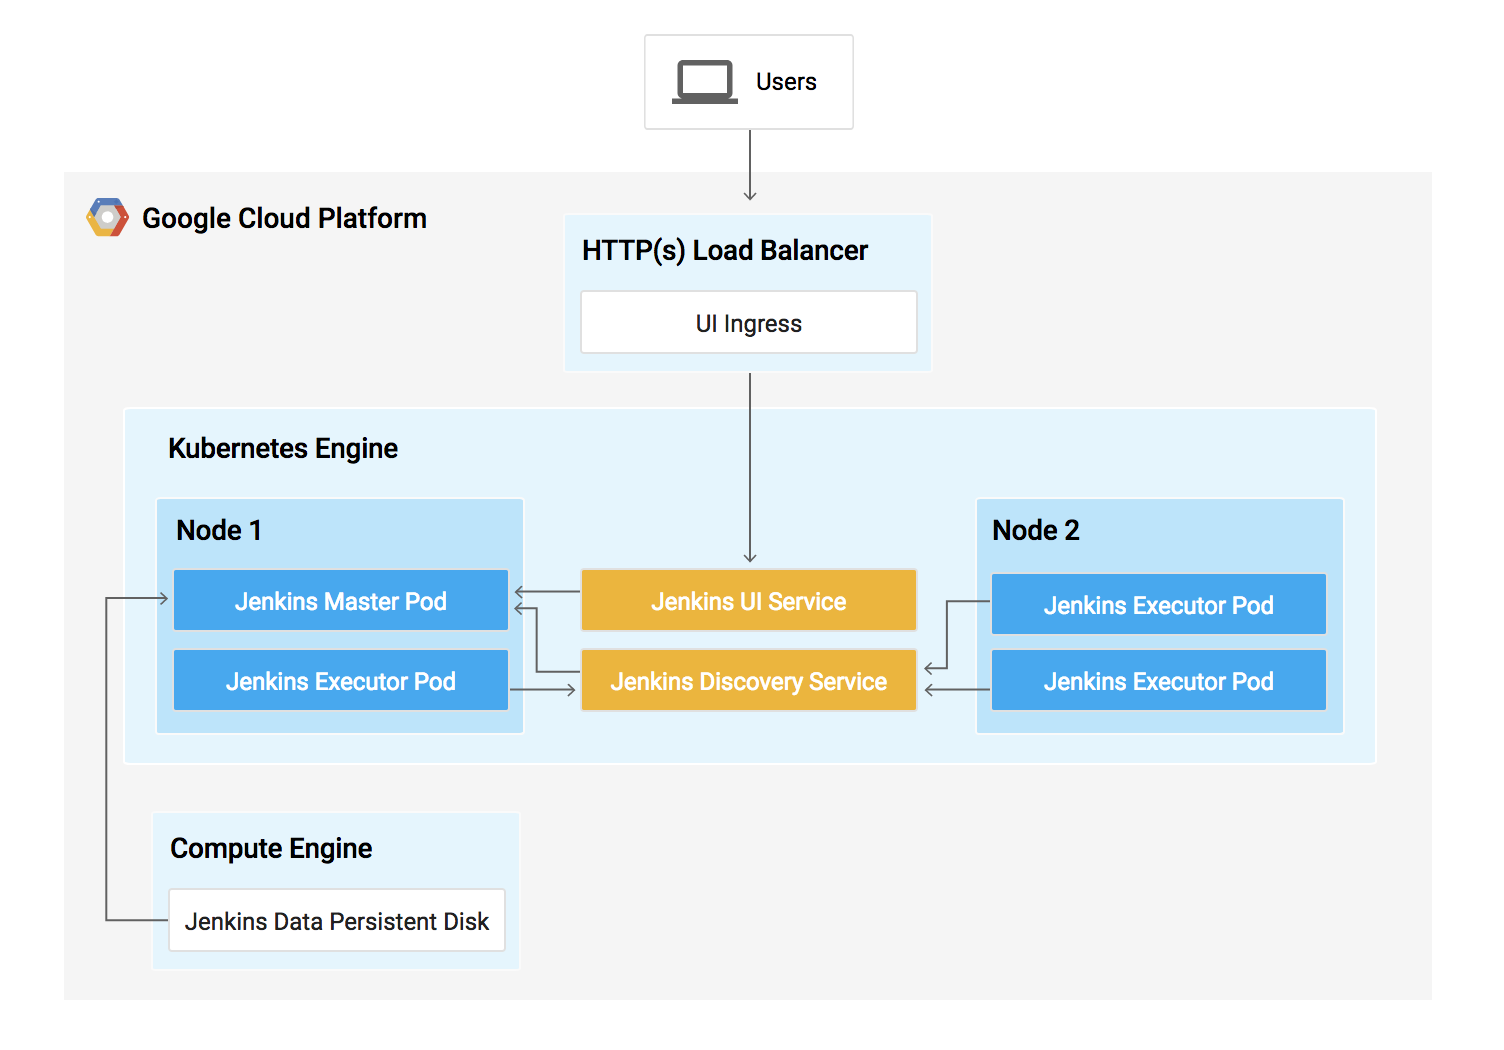
You are using the Kubernetes Plugin so that our builder nodes will be automatically launched as necessary when the Jenkins master requests them.
For more information,
Connect to Jenkins
- The Jenkins chart will automatically create an admin password for you. To retrieve it, run:
printf $(kubectl get secret cd-jenkins -o jsonpath="{.data.jenkins-admin-password}" | base64 --decode);echo
- To get to the Jenkins user interface, click on the Web Preview button in cloud shell, then click Preview on port 8080:
- You should now be able to log in with username
adminand your auto-generated password.
Understanding the Application
The application mimics a microservice by supporting two operation modes.
- In backend mode: gceme listens on port 8080 and returns Compute Engine instance metadata in JSON format.
- In frontend mode: gceme queries the backend gceme service and renders the resulting JSON in the user interface.
Deploying the Application
You will deploy the application into two different environments:
- Production: The live site that your users access.
- Canary: A smaller-capacity site that receives only a percentage of your user traffic. Use this environment to validate your software with live traffic before it’s released to all of your users.
1.Create the Kubernetes namespace to logically isolate the deployment:
kubectl create ns production
2.Create the production and canary deployments, and the services using the kubectl apply commands:
kubectl apply -f k8s/production -n production

kubectl apply -f k8s/canary -n production

kubectl apply -f k8s/services -n production
By default, only one replica of the frontend is deployed. Use the kubectl scale command to ensure that there are at least 4 replicas running at all times.
3.Scale up the production environment frontends by running the following command:
kubectl scale deployment gceme-frontend-production -n production --replicas 4
4.Confirm that you have your pods running for the frontend and backend,
kubectl get pods -n production -l app=gceme -l role=frontend

kubectl get pods -n production -l app=gceme -l role=backend
5.Retrieve the external IP for the production services:
kubectl get service gceme-frontend -n production
6.Now, store the frontend service load balancer IP in an environment variable for use later:
export FRONTEND_SERVICE_IP=$(kubectl get -o jsonpath="{.status.loadBalancer.ingress[0].ip}" --namespace=production services gceme-frontend)
Confirm that both services are working by opening the frontend external IP address in your browser.
Creating the Jenkins Pipeline
Creating a repository to host the sample app source code
1.Create a copy of the gceme sample app and push it to a Cloud Source Repository:
gcloud source repos create default
2.Initialize the sample-app directory as its own Git repository:
git config credential.helper gcloud.sh
3.Run the following command:
git remote add origin https://source.developers.google.com/p/$DEVSHELL_PROJECT_ID/r/default
4.Set the username and email address for your Git commits. Replace [EMAIL_ADDRESS] with your Git email address and [USERNAME] with your Git username:
git config --global user.email "[EMAIL_ADDRESS]"

git config --global user.name "[USERNAME]"
5.Add, commit, and push the files:
git add .

git commit -m "Initial commit"

git push origin master
Adding your service account credentials
Configure your credentials to allow Jenkins to access the code repository. Jenkins will use your cluster’s service account credentials in order to download code from the Cloud Source Repositories.
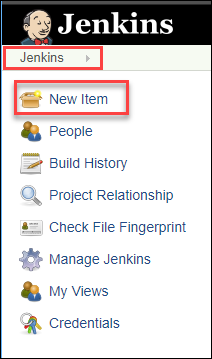
1. In the Jenkins user interface, click Manage Jenkins in the left navigation then click Manage Credentials.
2.Click Jenkins
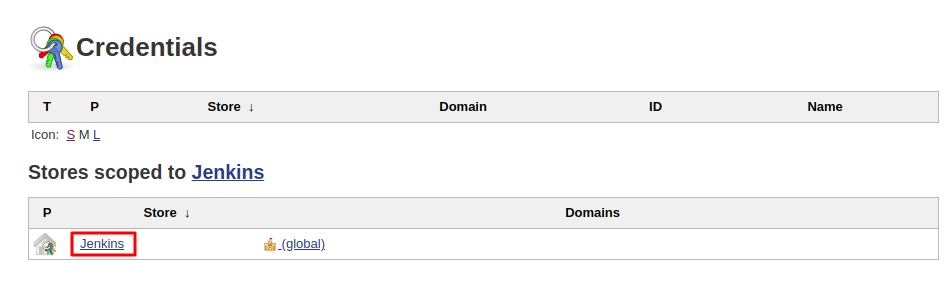
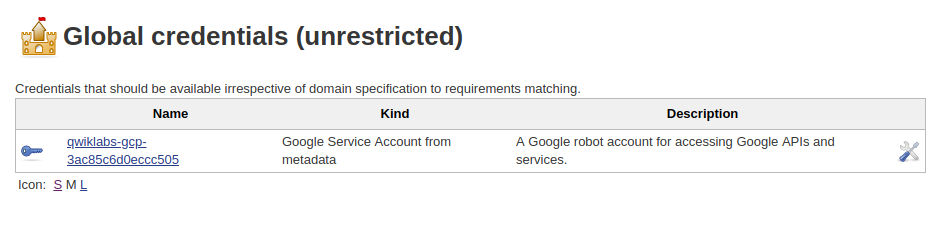
3.Click Global credentials (unrestricted).
4.Click Add Credentials in the left navigation.
5.Select Google Service Account from metadata from the Kind drop-down and click OK.
Creating the Jenkins job
Navigate to your Jenkins user interface and follow these steps to configure a Pipeline job.
1.Click Jenkins > New Item in the left navigation:
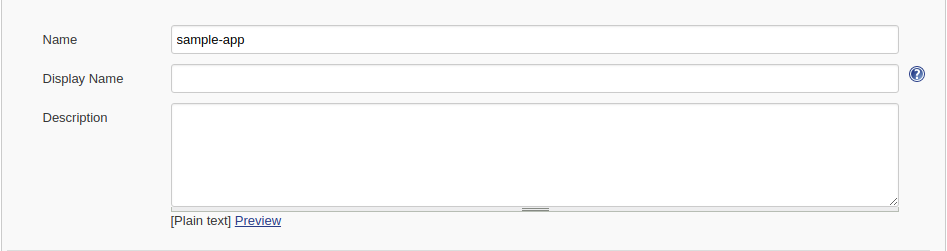
2.Name the project sample-app, then choose the Multibranch Pipeline option and click OK.
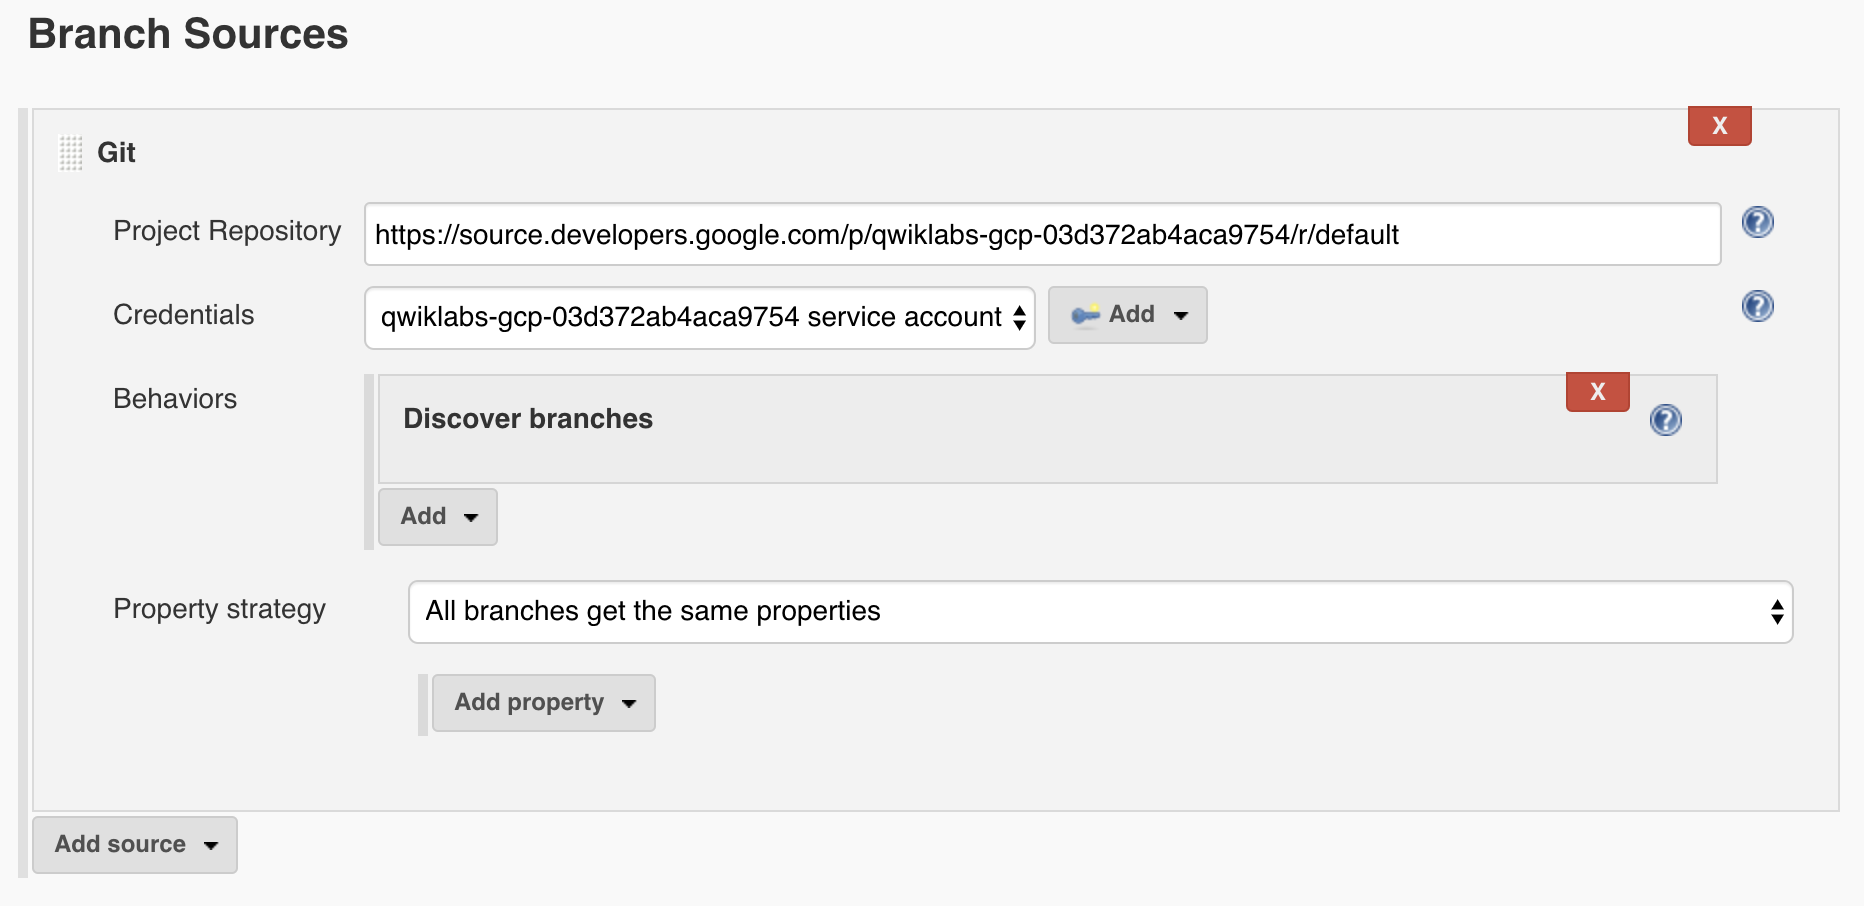
3.On the next page, in the Branch Sources section, click Add Source and select git.
4.Paste the HTTPS clone URL of your sample-app repo in Cloud Source Repositories into the Project Repository field. Replace [PROJECT_ID] with your Project ID:
https://source.developers.google.com/p/[PROJECT_ID]/r/default
5.From the Credentials drop-down, select the name of the credentials you created when adding your service account in the previous steps.
6.Under Scan Multibranch Pipeline Triggers section, check the Periodically if not otherwise run box and set the Interval value to 1 minute.
7.Your job configuration should look like this:

8.Click Save leaving all other options with their defaults
Creating the Development Environment
1.Create a development branch, to create a development environment from a feature branch, you can push the branch to the Git server and let Jenkins deploy your environment:
2.Modifying the pipeline definition
The Jenkinsfile that defines that pipeline is written using the Jenkins Pipeline Groovy syntax. Pipelines support powerful features like parallelization and require manual user approval.
1.Modify the site
2.Kick off Deployment
Commit and push your changes:
git add .

git commit -m "Version 2.0.0"

git push origin new-feature
This will kick off a build of your development environment.
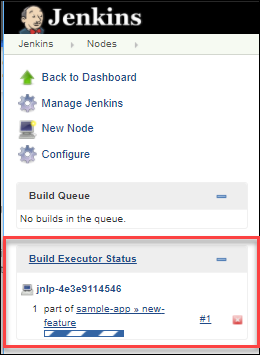
After the change is pushed to the Git repository, navigate to the Jenkins user interface where you can see that your build started for the new-feature branch. It can take up to a minute for the changes to be picked up.
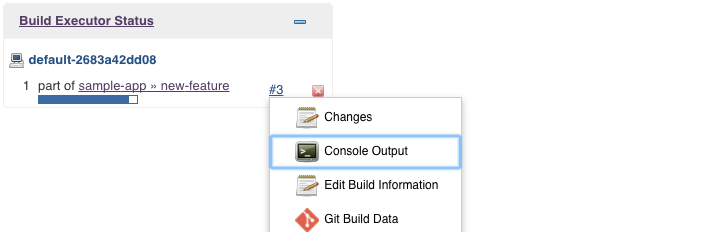
After the build is running, click the down arrow next to the build in the left navigation and select Console output:
To help secure your application, you can use kubectl proxy. The proxy authenticates itself with the Kubernetes API and proxies requests from your local machine to the service in the cluster without exposing your service to the Internet.
3.Deploying a Canary Release
You have verified that your app is running the latest code in the development environment, so now deploy that code to the canary environment.
Create a canary branch and push it to the Git server:
git checkout -b canary

git push origin canary
In Jenkins, you should see the canary pipeline has kicked off. Once complete, you can check the service URL to ensure that some of the traffic is being served by your new version.
export FRONTEND_SERVICE_IP=$(kubectl get -o \
jsonpath="{.status.loadBalancer.ingress[0].ip}" --namespace=production services gceme-frontend)
while true; do curl http://$FRONTEND_SERVICE_IP/version; sleep 1; done
4.Deploying to production
Create a canary branch and push it to the Git server:
git checkout master

git merge canary

git push origin master
In Jenkins, you should see the master pipeline has kicked off. Once complete (which may take a few minutes), you can check the service URL to ensure that all of the traffic is being served by your new version, 2.0.0.
export FRONTEND_SERVICE_IP=$(kubectl get -o \
jsonpath="{.status.loadBalancer.ingress[0].ip}" --namespace=production services gceme-frontend)
while true; do curl http://$FRONTEND_SERVICE_IP/version; sleep 1; done
kubectl get service gceme-frontend -n production


One thought on “Google Kubernetes Engine basics”