Do you get git ? , if not then this might be really helpful for you .
Q1.Why know version control ?
It’s super important to have detailed historical information for your organization’s configuration files and automation code. This let’s the administrators see what was modified and when, which can be critical to troubleshooting. It also provides a documentation trail that will let future IT specialists know why the infrastructure is the way it is, and it provides a mechanism for undoing a change completely. This way, we don’t have to undo changes from memory and there’s less chance of human error.
example :If you are updating your source code for python3 for all machines, and you push this change. Now there are bugs in machines possessing python2, well you could either fix the bugs quickly, but a quick bug fix might not be a permanent solution. Hence, you could do a rollback the the previous source code which worked on all machines and then modify and test your new code, and then update the source code.
Q2.Why keep Historical changes in version control ?
These copies let you see what the project was like before, and go back to that version if you end up deciding that the latest changes were wrong.
They also let you see the progress of the changes over time, and maybe even help you understand why a change was made. We say that this is primitive because it’s very manual and not very detailed.
- First, you need to remember to make the copy.
- Second, you usually make a copy of the whole thing, even if you’re only changing one small part.
- Third, even if you’re emailing your changes to your colleagues, it might be hard to figure out at the end who did what, and more importantly, why they did it.
Q3.When did we git it ?
In 2002, the Linux kernel project began using a proprietary DVCS called Bit-keeper.
In 2005, the relationship between the community that developed the Linux kernel and the commercial company that developed Bit-keeper broke down, and the tool’s free-of-charge status was revoked. This prompted the Linux development community (and in particular Linus Torvalds, the creator of Linux) to develop their own tool based on some of the lessons they learned while using Bit-keeper. Some of the goals of the new system were as follows:
- Speed
- Simple design
- Strong support for non-linear development (thousands of parallel branches)
- Fully distributed
- Able to handle large projects like the Linux kernel efficiently (speed and data size)
This is the beauty of open source contributions, in my eyes.
Q4.What is version control ?
According to Git documents, Version control is a system that records changes to a file or set of files over time so that you can recall specific versions later. For the examples in a book, you can keep bookmarking at important moments in the book, so you can comeback to that page.
There can be three ways you can utilize it,
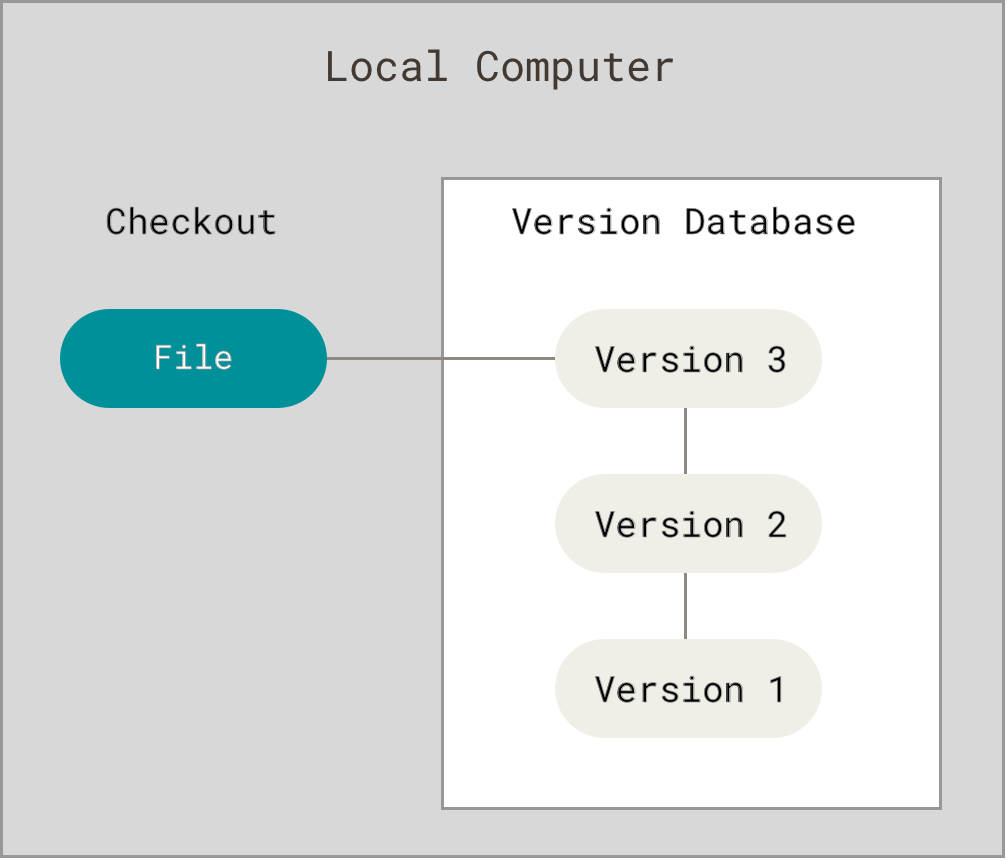
1.Local version, just modifying stuff in your local machine
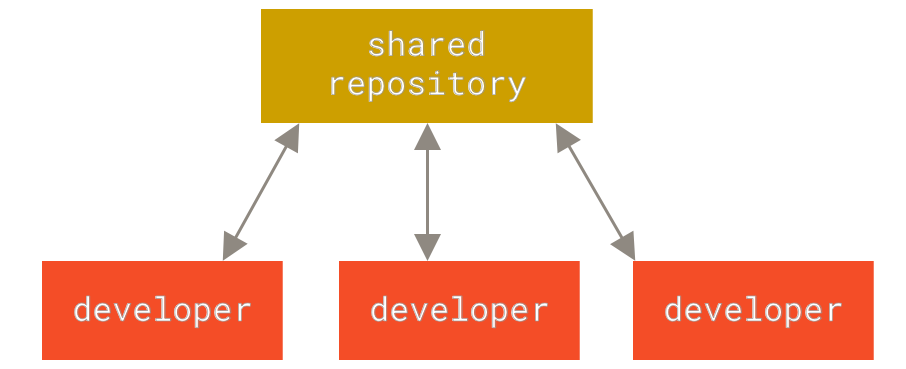
2.Centralized version, just modifying stuff in your local centralized connection
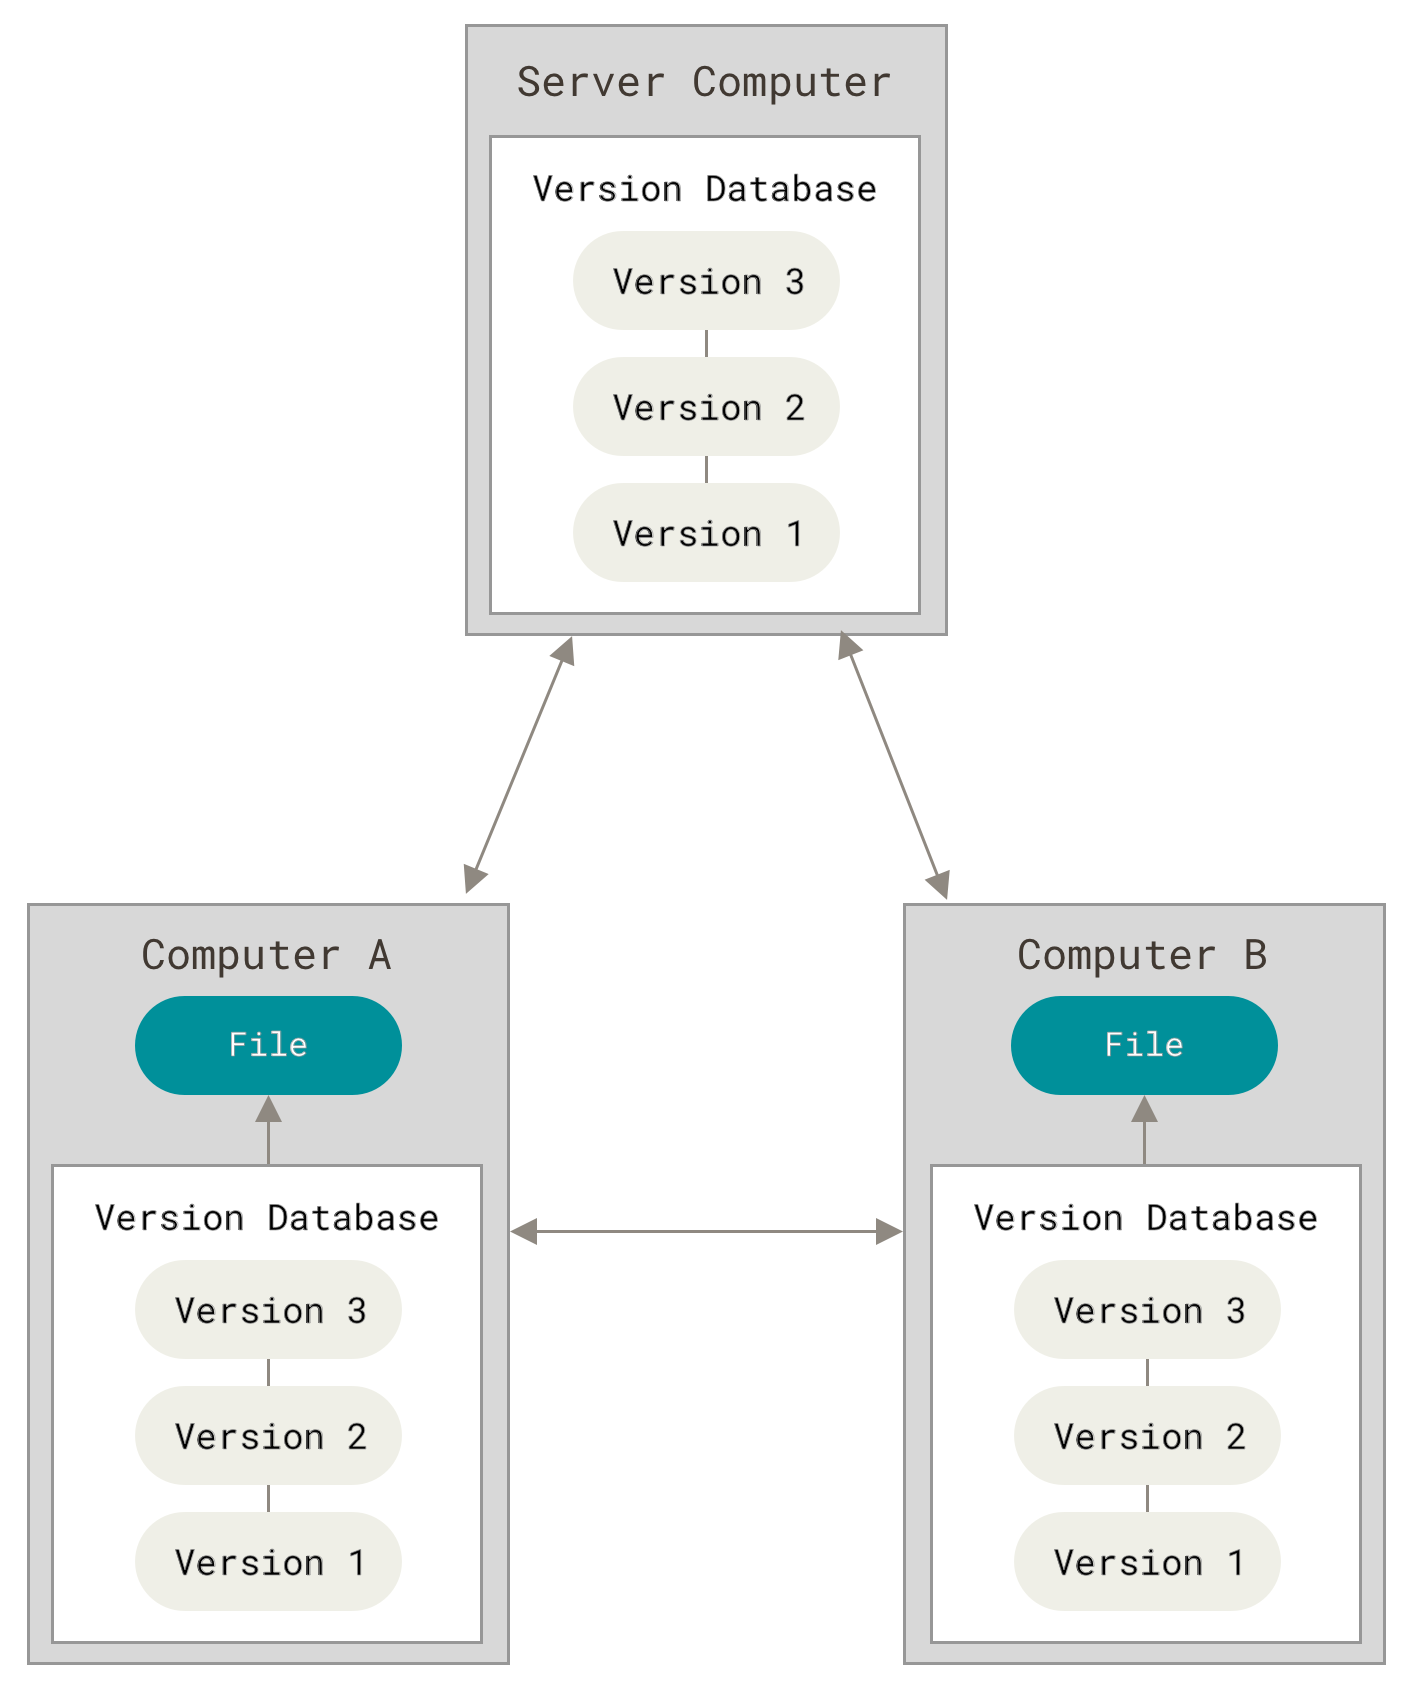
3.Distributed version, this is basically what git is a distributed version control .
Q5.What is GIT?
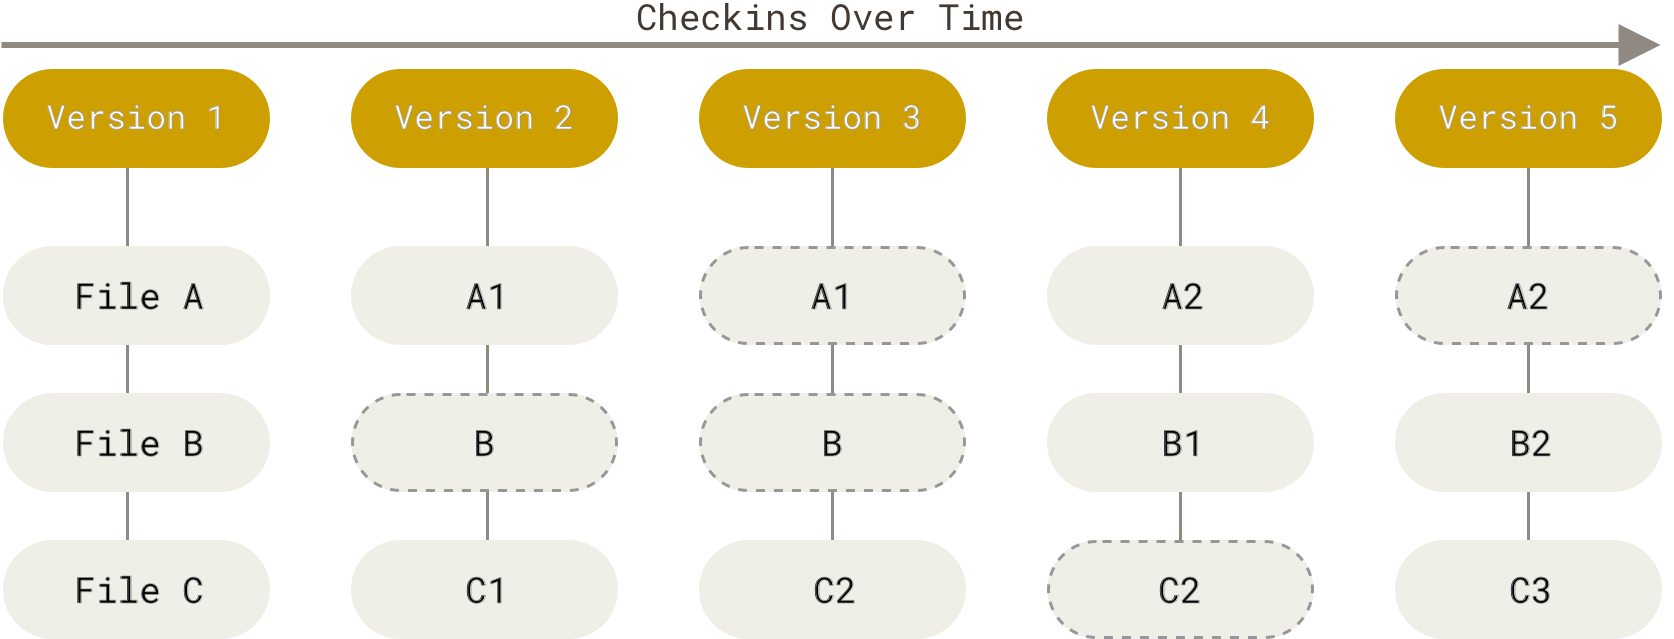
Git thinks of its data more like a series of snapshots of a miniature filesystem. With Git, every time you commit, or save the state of your project, Git basically takes a picture of what all your files look like at that moment and stores a reference to that snapshot. Git thinks about its data more like a stream of snapshots.
Commit -> make edits to multiple files and treat that collection of edits as a single change. It also author of the commit to write, what all bugs did he change, why did he do it, etc.
Repository-> contains all related code files, Similar to a directory in Ubuntu.
for more info,
1.Installing Git on Ubuntu
1.Command to install git in your PC ,
$ sudo apt install git-all
2.Check the version of git in your PC , it should be above 2.0
$ git --version
3.Fill the global name and email settings
$ git config --global user.name "Your_Name"
$ git config --global user.email "Your_Email@example.com"
4.Select a text editor,
$ git config --global core.editor nano
5.To check the config files,
$ git help config
For more info,
2.commands to help you
Cause now we have documented copy of all the changes happening to the repository , hence we can easy make copies or change the file and integrate it back. How to compare files,
A few terminal file keywords,
1.diff : tells difference between two files ,
diff old_file new_file > change.diff
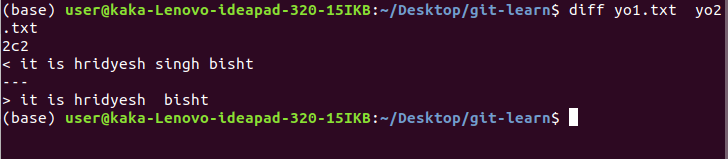
here c -> changed , a -> add, u ->unified format  , -  ->lines removed and + -> lines added.
w -diff is used to see the words that have been changed

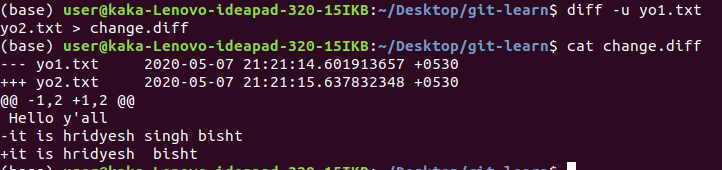
2.Making a file which contains our changes, done by diff -u old_file new_file > change.diff
3.patch :takes a file generated by diff and applies it to the original file
patch new_file < change.diff
< acts as a standard input to a file,

4. Practical approach to diff and patch files
Now consider a friend (A) , asked you to fix a code file, now there are two ways to do it.
- You send me a complete working file from scratch, Now finding the bug in the file you sent will be tough for A.
- A will send her your file, you will fix the bug and send it back. Which will be easier compared to previous solution but still will be comparatively tough.
- Using diff and patch,
Now how can you do it using diff and patch,
- Now A sends a file, then we will copy the code in a new file called improved_file.
- Now we will work on our improved file, then use diff file to save it into a new file.
- diff -u A.py improved_file.py < change.diff
- then send Shruti our change.diff file, so she can see the changes we made.
- Finally Shruti can patch the change.diff to A.py
- patch A.py < change.diff.
For more information,
6.Basics of GIT
1. First Steps
- The git directory contains all the changes and their history and the working tree contains the current versions of the files.
- The staging area which is also known as the index is a file maintained by Git that contains all of the information about what files and changes are going to go into your next command.
Now the steps that happen are,
- We have to set out name and email in the git as discussed above.
- We can either initialize a git repository by using git init.
- Or copy a git repository using git clone URL.
- After copying the file into git repository, we add it to the staging area
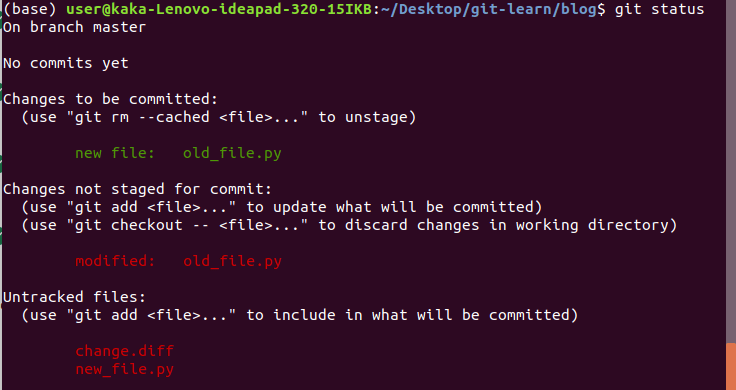
- git status gives us all the information about working tree
- git commit, opens a text editor. Then enter the commit message in the text editor.
- If there is no commit message, then it is going to abort the commit message.
2.Tracking files
- tracked files : part of the screenshot
- UN-tracked files : not part of the screenshot
Git has three main states that your files can reside in: modified, staged, and committed:
- Modified means that you have changed the file but have not committed it to your database yet.
- Staged means that you have marked a modified file in its current version to go into your next commit snapshot.
- Committed means that the data is safely stored in your local database.

3.Workflow
The basic Git workflow goes something like this:
- You modify files in your working tree.
- You selectively stage just those changes you want to be part of your next commit, which adds only those changes to the staging area.
- You do a commit, which takes the files as they are in the staging area and stores that snapshot permanently to your Git directory.
1.Initializing the git Repository

2.git status to show the condition of the file,

3.git add to add files into the staging area,

4.git status to show the files added to the staging area,
5.git push -u origin master : this is the step to push the file to git,
for more info,
4.Head POINTER IN GIT
- Git uses the head alias to represent the currently checked out snapshot of your project. This lets you know what the contents of your working directory should be.
- head is used to indicate what the currently checked out snapshot is
- We can even use git to go back in time and have head representing old commit from before the latest changes were applied, if a bug comes up.
Example : Think about it as a bookmark that you can use to keep track of where you are. Even if you have multiple books to read, the bookmark allows you to pick up right where you left off.
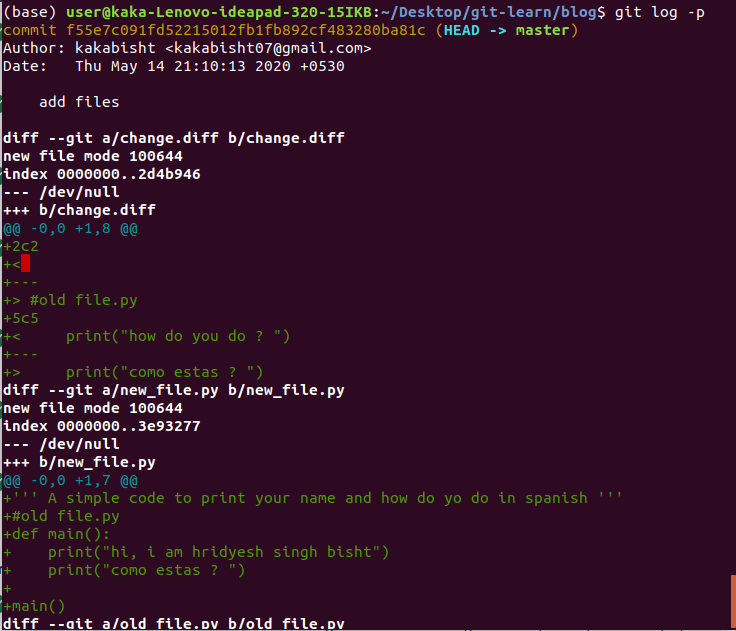
5.More information about our changes
- git log -p :
2. git show commit-id : to display a particular commit
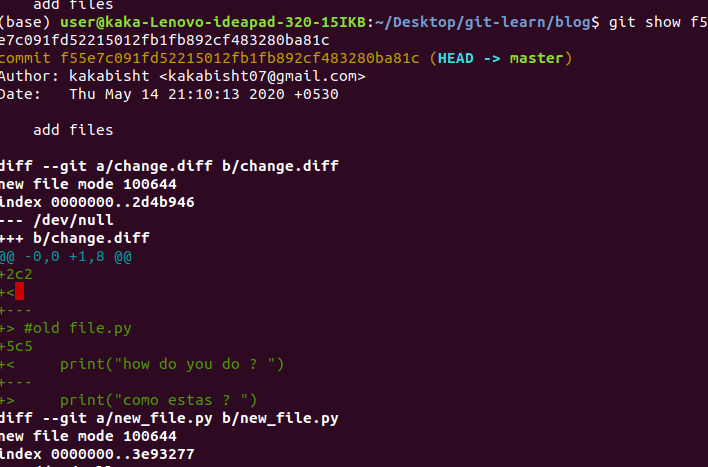
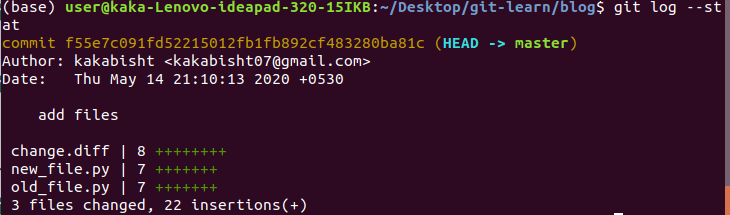
3.git log — stat
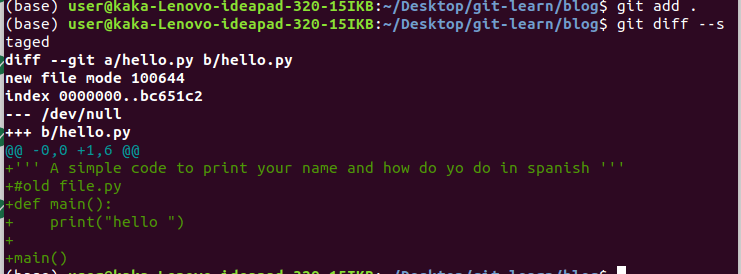
4.git diff –staged : staged but no committed
5.git rm to remove a file

.gitignore files
.gitignore files are used to tell the git tool to intentionally ignore some files in a given Git repository. For example, this can be useful for configuration files or metadata files that a user may not want to check into the master branch. Check out more at: https://git-scm.com/docs/gitignore.
6.Branches
In Git, a branch at the most basic level is just a pointer to a particular commit. But more importantly, it represents an independent line of development in a project. Of which the commit it points to is the latest link in a chain of developing history. The default branch that Git creates for you when a new repository initialized is called master.
master branch is for the working source code, where as branches are used to new features or fixes, that might work. So, a branch helps you try out these features without corrupting the actual source code.
Example : Imagine you have an assignment, you are going to keep few notebooks one for the final submission ( master branch ), which will be neat and clean, others in which you have rough draft of the submission (branches).
1.git branch : shows all the branches present.

2.git new branch new_branch_name : to create a new branch
3.git checkout branch_name : to change the branch we are working on
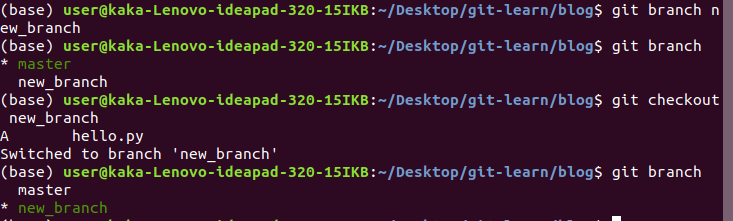
the green (*) shows the current branch we are on.
Now the practical demo, let us consider we are adding a new file in new_branch know as yolo.py, now when we add and commit this file in the new_branch it will only be present in new_branch not in master branch. As you can see, there is a difference in the log files between two branches,

7.Merging
When our experimental code in new_branch work, we can add that piece of code back to the master branch using merge command.
- Switch to master branch
- Merge the new_branch
- check the log of the master branch
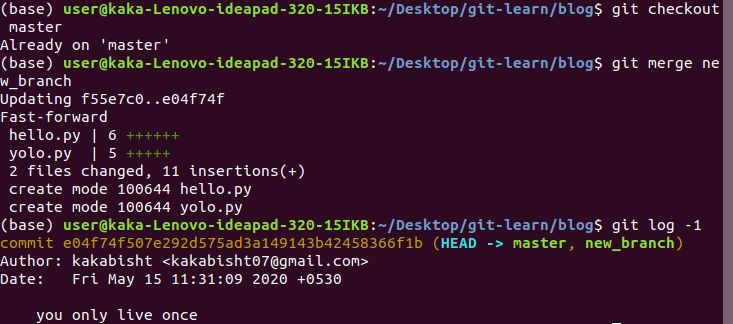
Now head pointer points at both master branch as well as new_branch, there are two main merging algorithms.
- fast forward merge : linear path
- three way merge : non linear path
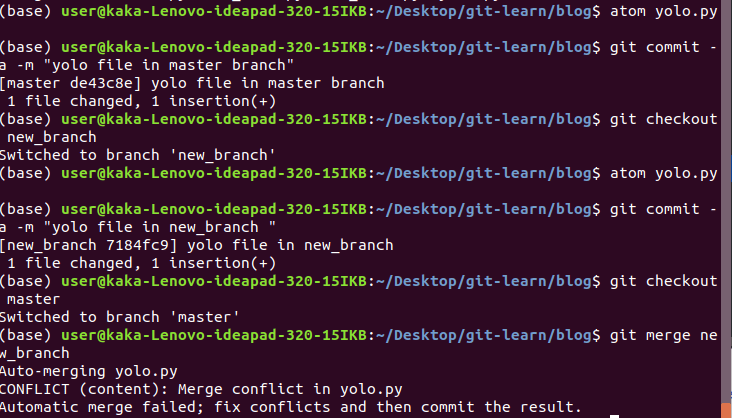
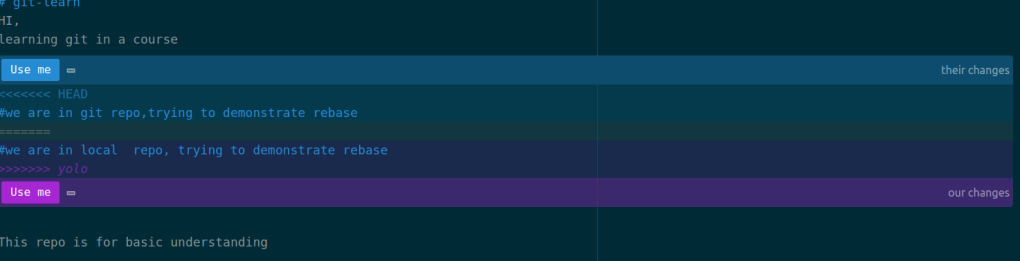
Now in three way merge, if we change same content of same file on two different branches, then add and commit them. When we merge them git wont know which command to consider or to discard, hence merge conflict arises.
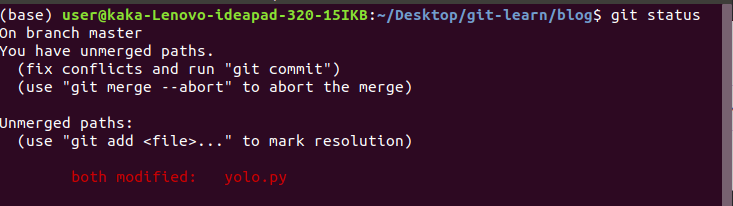
now we use git status to help us, what is happening here
Now to fix merge conflicts we open, the file that we modified,

Now we see the modification we need to do,

now we add the file and commit it to see that the conflict has been resolved,
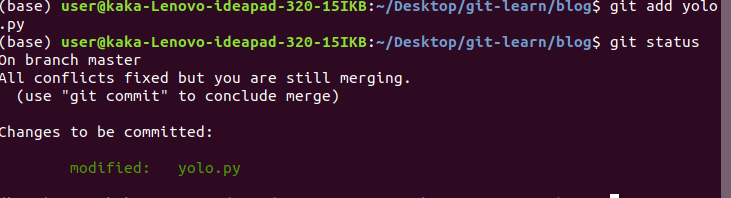
then we call git commit to complete the resolve, along with git log to see the changes done.

git log –graph –oneline = This shows a summarized view of the commit history for a repo.
7. What is GitHub ?
GitHub is a web-based Git repository hosting service. On top of the version control functionality of Git, GitHub includes extra features like bug tracking, wikis, and task management. GitHub lets us share and access repositories on the web and copy or clone them to our local computer, so we can work on them. GitHub is a popular choice with a robust feature set, but it’s not the only one. Other services that provide similar functionality are Bit-bucket, and Git-Lab.
Follow the workflow at https://github.com/join to set up a free account, username, and password. After that, these steps will help you create a brand new repository on GitHub.
1.Workflow on GitHub,
- git clone https:gitrepo.git , to copy the GitHub files into local repository
- you now have a local repository, where you modify code
- then you add and commit the files
- git pull is used to fetch the updates happened on GitHub remote repository.
- then you push the file using git push
This can be useful for keeping your local workspace up to date.
- https://help.github.com/en/articles/caching-your-github-password-in-git
- https://help.github.com/en/articles/generating-an-ssh-key
When we call a git clone to get a local copy of a remote repository, Git sets up that remote repository with the default origin name

Whenever we’re operating with remotes, Git uses remote branches to keep copies of the data that’s stored in the remote repository. We could have a look at the remote branches that our Git repo is currently tracking by running git branch -r

git remote show origin will tell if our git repository has been updated, and now we have to pull data from git repository.
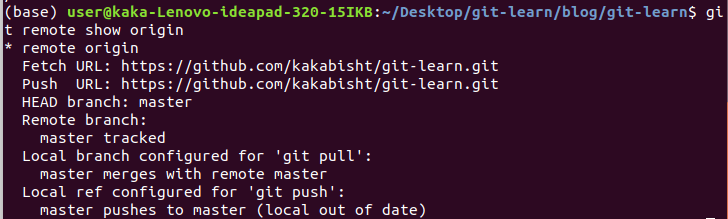
we use git fetch
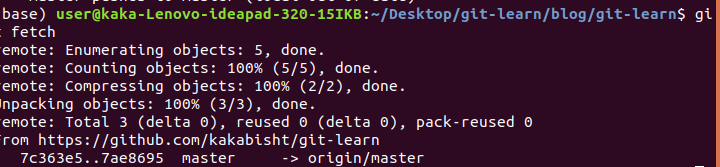
if then we use git status, it tells our local repo is behind the git repo.

git fetch fetches remote updates but doesn’t merge; git pull fetches remote updates and merges.
- git remote update : Fetches the most up-to-date objects
- git branch -r : Lists remote branches; can be combined with other branch arguments to manage remote branches
- >>> -> conflict markers
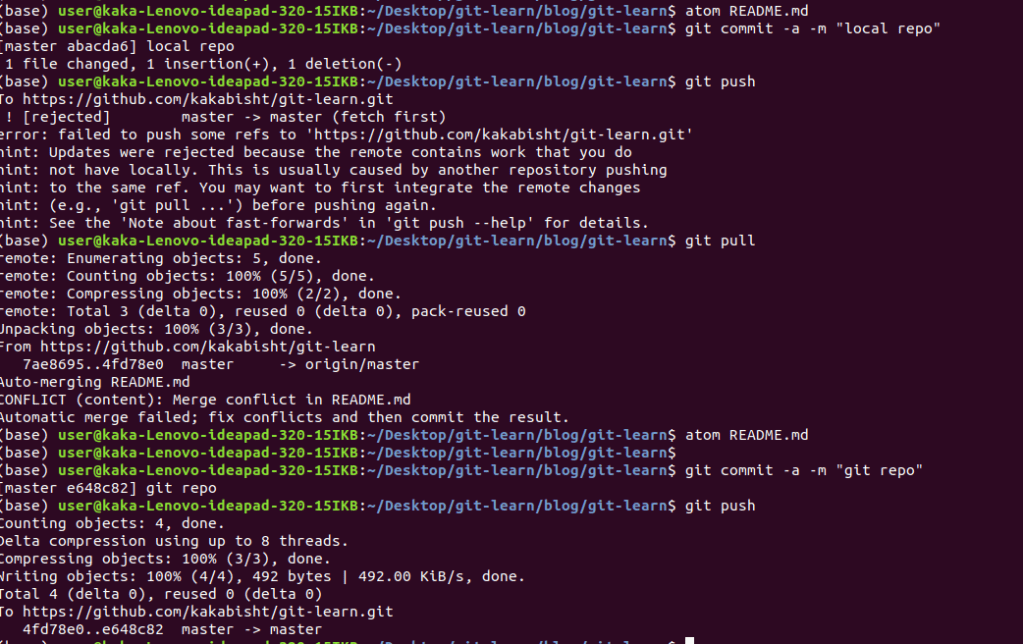
2.The Pull-Merge-Push Workflow :
Here we use the three way merge, for example if we modified code and were pushing the code but our git remote repository is also modified it will show an error in pushing. To solve that error,
- We need to use git pull
- check for any merge conflicts
- then add and commit the files
- then finally push the file.
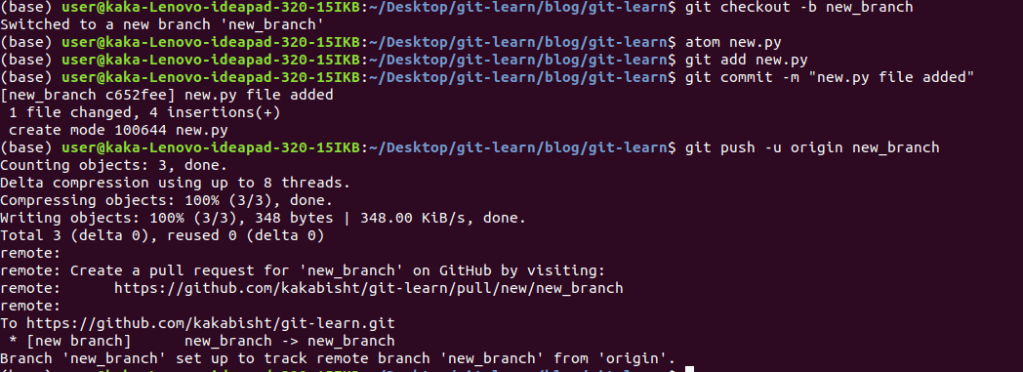
when we push a branch to the repo we need to add, a few parameters on the push command, git push -u origin branch_name.
3.Rebasing
Rebasing means changing the base commit that’s used for our branch
The problem with three way merges is that because of the split history, it’s hard for us to debug when an issue is found in our code, and we need to understand where the problem was introduced. By changing the base where our commits split from the branch history, we can replay the new commits on top of the new base. This allows Git to do a fast forward merge and keep history linear.
We run the command git rebase, followed by the branch that we want to set as the new base. When we do this, Git will try to replay our commits after the latest commit in that branch. This will work automatically if the changes are made in different parts of the files, but will require manual intervention if the changes were made in other files.
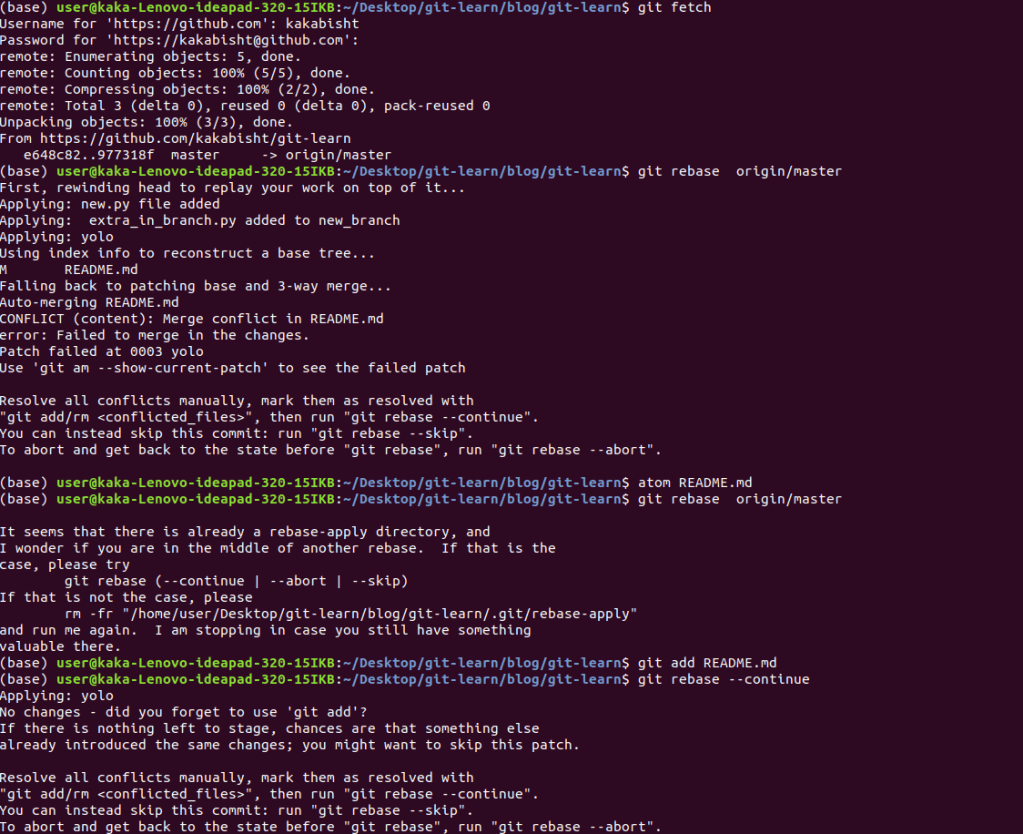
example : If we were working on the main branch and so was our co-worker, he might have added changes different to ours. Hence we,
1.git fetch the recent changes done in GitHub repository
2.we try to rebase, in which it shows merge conflicts
3.we resolve the merge conflicts, then add the file

4.we add the file again, and use git rebase –continue.
Merge conflicts are not uncommon when working in a team of developers, or on Open Source Software. Fortunately, GitHub has some good documentation on how to handle them when they happen:
- https://help.github.com/en/github/collaborating-with-issues-and-pull-requests/about-merge-conflicts
- https://help.github.com/en/github/collaborating-with-issues-and-pull-requests/resolving-a-merge-conflict-using-the-command-line
4.Collaboration
Forking is a way of creating a copy of the given repository so that it belongs to our user. In other words, our user will be able to push changes to the forked copy, even when we can’t push changes to the other repo. When collaborating on projects hosted on GitHub,
A pull request is a commit or series of commits that you send to the owner of the repository so that they incorporate it into their tree.
1. A typical pull request workflow,
- fork the repo, you want to work on.
- clone in on the local repo, by git clone.
- create a new branch, work with modifications in a new branch
- add and commit the changes made,
- git push -u origin files
- the create a pull request, by going on to the GitHub web interface and click on compare & pull request .
Now if we have to modify our pull request ,then
- we open the file, apply the changes
- we add and commit the file
- we push the file
- then in our GitHub interface, we can see our new as well old pull request there.
Now what to do if you are supposed to squash you changes in a single commit,
- we will call git rebase -i master : it shows a list of all the commits
- The default action here is pick which takes the commits and rebases them against the branch we selected
- we have two options, I recommend squash
- squash : two commits are added together, open up a text editor to edit
- fix up : discards the old commit
- after this we are given a text file to edit, as our final squashed commit
- save and exit from the commit editor
- Now we don’t want to merge our branches, but modify our previous commit history hence we push forcefully
2.Code reviews
Doing a code review means going through someone else’s code, documentation or configuration and checking that it all makes sense and follows the expected patterns. The goal of a code review is to improve the project by making sure that changes are high quality. It also helps us make sure that the contents are easy to understand. That the style is consistent with the overall project. And that we don’t forget any important cases.
Nit – a minor bug
Style guide : pep8 for python, for more info go through these.
- http://google.github.io/styleguide/
- https://medium.com/osedea/the-perfect-code-review-process-845e6ba5c31
- https://smartbear.com/learn/code-review/what-is-code-review/
Now some resources from which I gained my knowledge,