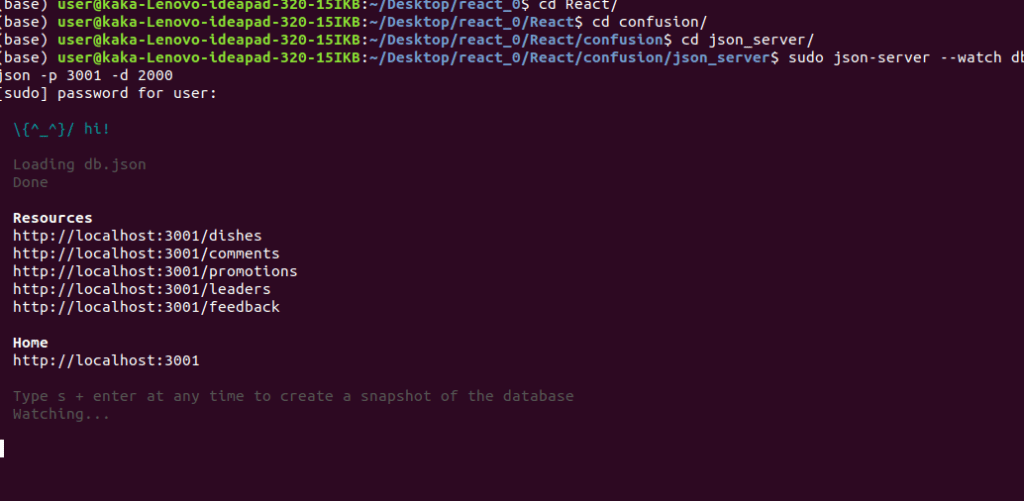
Setting up a Server using json-server
It helps us to quickly set up a simple server with several data that is given to it in the form of a JSON file. And also sum up images that might be required by our application.
To install json-server,
npm install json-server -g
To start json-server,
json-server --watch db.json -p 3001 -d 2000
For more information,
Promises:
As we realized when we make any request to a backend server, it is going to take some time for the results to become available. If we do such a request while we are proceeding with our work, then, there is a high likelihood that our computation will get stuck at the point waiting from the results. This is a no no in terms of a good user experience. So, it is important that whenever your results are going to take time you should be able to proceed forward without waiting for the result. Promises provide us with a way of dealing with this.
Q.what exactly is a promise?
A promise is a mechanism that supports asynchronous computation.
Now, in using a promise, the promise provides a mechanism or a proxy for a value that is not available at the moment that you asked for it. So a promise will return a promise to you saying that when the result becomes available it’ll come back and deliver the results to you. So, a promise returns a proxy object to you and you hold onto the proxy object and that proxy object will give you access to the results when they become available. There is a method in how you wait for the results. You actually don’t suspend your computation at that point instead, you configure a way of accepting the results when it comes back from the promise. To put it in a nutshell, promise represents a value that would be available at a future time. It may be also immediately available in which case the promise will return the value immediately. But in case it needs to return a value at a future date then it gives you the promise that that value when it becomes available, will be returned to you.
There’s always the possibility that the promise cannot be met because the results are unavailable for whatever reason. In that case, an error will be delivered to you, or a reject will be delivered to you and it is up to you to deal with the fact that the promise was rejected.
So when you deliver a promise to somebody the promise internally will have a function that will deal with both the resolve and the reject options inside there. Then you write code.
import * as ActionTypes from './ActionTypes';

export const Comments = (state = { errMess: null, comments:[]}, action) => {
  switch (action.type) {
    case ActionTypes.ADD_COMMENTS:
      return {...state, errMess: null, comments: action.payload};

    case ActionTypes.COMMENTS_FAILED:
      return {...state, errMess: action.payload};

    case ActionTypes.ADD_COMMENT:
        var comment = action.payload;
        return { ...state, comments: state.comments.concat(comment)};


    default:
      return state;
  }
};
So, you can chain a set of then methods together to deal with promises one behind other. If the result is immediately available or if you are going to reject immediately then promise provides a method of immediately returning without waiting for their promise to either resolve or reject. In that case, you would simply say promise with the capital P.resolve and promise.reject, and then return either the result or the error immediately.
Fetch
The Fetch API is proposed as a modern replacement for XMLHttpRequest. Now, it is quite new and so some of the older or legacy browsers do not support it yet. But the newer browsers are all beginning to support the Fetch API as part of the browser itself. Now this provides an interface for fetching resources including from across the network. That’s indeed the purpose of Fetch. And Fetch provides a more powerful feature set and more flexible feature set than what XMLHttpRequest provides.
Now Fetch API inherently supports promised based approach for communication. So Fetch supports promises inherently and that is what makes it valuable for use in communicating with a server
In Fetch, a request represents a resource request. And similarly, a response represents the response to the request that you send to the server. Now the request and response are objects that you have access to and can manipulate it. Similarly, the headers object represents the request/response headers. Now you can query the headers, extract information, you can add headers to an outgoing request. You can extract headers from the incoming response and make use of them within your JavaScript code.
In addition, the body itself is another object that is part of the Fetch API and it provides methods relating to the body of the response or the request message. Now, you can declare the content type of the body, how the body should be handled. You can even put information into the body. You can extract the information of the body and so on, and that is all supported through Fetch API.
Q.how do we make use of the Fetch API?
A simple usage of the Fetch API is within your JavaScript code, you’ll simply say fetch and then supply the URL of the server that you want to access. So in this case representing the URL as a baseURL +, an extra part of the URL. This is exactly what I will use in the code in the exerciser slot. The baseURL is configured with the HTTP://, URL address for the server, and then the extension is the specific resource on the server that we are accessing.

Now once you issue this will return a promise object. Now when it returns a promise object, then on the promise object you can apply it then to the promise object. So as you can see you apply the then, and within the then you’ll get access to the response object. Now once you get the access to the response object, this response object is a raw body in the response message. You can convert it if you know that the response body contains data in JSON format. You can simply can work that by saying response.json and then that will give you the body in JSON format and so it is more easy for you to process that within your JavaScript code.
If you want to perform any other kind of HTTP request, other than get, then you can explicitly specify the method in a second parameter that you will supply to the fetch. The second parameter will be a JavaScript object with properties where you specify the details of what goes into the message. So, for example, if you are posting some data to a REST API endpoint, in order to create a new object on the server side. Then you could simply say, fetch and then supply the REST API end point following that within a JavaScript object you can specify the method as POST for example.
export const fetchDishes = () => (dispatch) => {
    dispatch(dishesLoading(true));

    return fetch(baseUrl + 'dishes')
        .then(response => {
            if (response.ok) {
                return response;
            } else {
                var error = new Error('Error ' + response.status + ': ' + response.statusText);
                error.response = response;

                throw error;
            }
        },
            error => {
                var errorMessage = new Error(error.errorMessage);
                throw errorMessage;
            }
        )
        .then(response => response.json())
        .then(dishes => dispatch(addDishes(dishes)))
        .catch(error => dispatch(dishesFailed(error.message)))
}
Now, when you send the POST request the server will then respond with a response message. And that response message can then get processed appropriately by using then and then catch, as we see. When the data is posted to the server side, the server will respond back with a reply. The reply might actually contain a copy of the data that is posted. Now this depends upon how you arrange your server side and what the server will send back in response to a post request. Now, if you’re implementing the server you have the full flexibility of implementing what the server will return in response to a post request.
What fetch does is if the status code in the response message is within the normal limits 200 to 299 then it will set a property call as OK on the response. And so you can check this response, start OK to see if it is true or false. If it is true, then the response that you get is a valid response. And so you can simply return that response over to the next then that you chain into the sequence of then there. Otherwise, so this is the otherwise part, if it is not then you recognize that your status code is outside the normal range that you would consider a normal response from the server side, in that case we will handle it with the else part. Here you have to explicitly create an error like this here, so you are extracting from the response. You’re saying response.status, response.status contains the status code.
Now if the server explicitly or if in communicating with the server you experience an error. So which means that you never even managed to communicate with the server. In that case, fetch will generate an error response and that is handled by giving a second callback function to the then. Promises allow you to give two callback functions as parameters to the then. The first callback function will be used when the promise resolves correctly. The second callback function will be used when the promise is rejected. So the error part is where the rejection of the promise is handled. So if it is rejected, then you will create an error message from the error message and then throw an error at that point. That’s another way of handling errors that are caused. So this is fully your responsibility, this part of the code is something that you implement when you use fetch.
For more information,
- JavaScript Promise
- JS Promise (Part 1 – Basics)
- JavaScript Promises for Dummies
- JavaScript Promises: an Introduction
- Introduction to fetch()
- Using Fetch
- Fetch vs. Axios.js for making http requests
React Animations
Animations in the user interface adds a lot to the user experience for your application. Subtle animations that give visual feedback to the users, definitely add to a better user experience
Now, the React-transition-group supports React animations through a set of CSS transitions that we can express using CSS classes. Now, the React-transition-group used to be part of React in some of the very old versions of React, but there after has been separated out into its own NPM module called as React-transition-group. So, now if you want to use it in your React application unit, explicitly install that and then make use of it in your application.
The React-transition-group provides a set of components that enable you to manage components tips including mounting and unmounting. So, they help to recognize when components are getting mounted and unmounted, and then they are designed specifically with animation in mind. The components supported by the React-transition-group include a transition, a CSS transition, and a TransitionGroup, each meant for a specific purpose. The transition is a generic transition and it lets you describe a transition from one component state to another component state over time. Now, when you define component state, the transition component has four states that it goes through: the entering, the entered, the exiting and exited state. So, whatever you put inside the transition component, you will apply the corresponding transitions when the enclosing children are being rendered, or mounted, and then unmounted.
The CSS transition has a property by name class names, and the class names takes a value there. So, for example, in this example, we give a class names as page. What this means is that, it will take four CSS classes which you will define in your CSS5. The four classes would be page enter, page interactive, page exit, and page exit active. Now, the page enter will be applied when you go into the entering state, and then when you reach the entered state, the page interactive will be applied, and the page exit and exit active as you would expect. These CSS classes have to be specified, and within those CSS classes, you’ll specify what kind of transition you want to cause. You can change the opacity, you can do the transformation, so x and y transformation on your elements and so on can be applied.
  .page-enter {
    opacity: 0.01;
    transform: translateX(-100%)
  }

  .page-enter-active {
    opacity: 1;
    transform: translateX(0%);
    transition: all 300ms ease-in
  }


  .page-exit {
    opacity: 1;
    transform: translateX(0%)
  }

  .page-exit-active {
    opacity: 0.01;
    transform: translateX(100%);
    transition: all 300ms ease-out
  }
The transition group is the component that the React-transition-group supports. The transition group manages a set of transitions that you apply to a list. So, if you are applying to a list, then you know that the list items may come in and go and so on. So, for example, if you have a long list and then you add a new item to the list and you wanted to animate the entering of the new item into that list, then the management of that, by using the transition class, that if you enclose the entire list in a transition group and then apply the transition to each list item, then the in property of the transition and the turning of the in prop to true and false will be controlled by the transition group. So, it automatically toggles the in prop for the components that are enclosed inside it. So, if you apply to a list each list item, the in prop will be toggled as required. So, if you add a new item into the list, let’s say, for example, your data changed and a new item just got added into the list, the new item will animate itself into the list in the view by using the TransitionGroup.

For more information,
- Animation Add-Ons
- react-transition-group
- React Transition Group Documents
- react-animation-components
- How to build animated microinteractions in React
- UI Animations with React — The Right Way
- React Animations in Depth
- What’s the most developer-friendly React animation library?
- Amazing React animation with react-pose
- Redux Actions
- Redux Reducers
- Redux Usage with React
- Cross-Fetch
- Animation Add-Ons
- react-transition-group
- React Transition Group Documents
- react-animation-components
Introduction to Webpack
What exactly is Webpack and how does it help us to build the distribution folder?
For our React Application, we had used Create React App to scaffold out our React Application. Create React App itself, uses React scripts and NPM module underneath for supporting all the various activities that we need to do for our React Application. It internally uses Webpack to do the building of the distribution folder.
Webpack, this is a definition from the Webpack documentation itself. It says, Webpack is a module bundler for modern JavaScript applications. Now, what Webpack does is, it looks at the entire structure of your application. So, it recursively traverses through your code looking to see how best to bundle the information into what is called as bundles. Then that pack looks at your code. It treats every file that you have, be it a JavaScript file, be it a CSS file, be it a Sass file, be it an image file, whatever, it treats every one of them as modules from its perspective and then it decides, what is the best way of packaging this modules into what are called bundles that can be downloaded from the server to your web browser in a comfortable and convenient manner.
hat pack knows how to package them and treat them as JavaScript modules when it prepares those bundles. So, a bundle is something that groups together modules that belong together. So, it bundles those modules together that should be served to the client in a single response to a request. So that pack itself makes a decision on saying, what part should be joined together into a bundle and should be delivered together so that the rendering of your web application is done in the most effective manner?
So, what Webpack does is, it starts at the top most level. So, it’s starts there and then it follows all the imports that you use in those down their path and build up a hierarchical organization of all the different parts. So, what is called as a dependency graph is built by the pack. Now, using this dependency graph, that pack then decides how to package its bundles and that emits one or more bundles as they make sense for your particular application that Webpack is bundling. In the process of doing it, when it is handling non-JavaScript files, like CSS, HTML and Sass or images and so on, then it uses plugins that enable you to pre-process and minify those files, those non-JavaScript files into a way that they can be bundled into your Webpack bundles. If you are using Webpack from the scratch, then you would describe some of the configuration for your Webpack to work on these files in a file named webpack.config.js which should be included in the root folder of your application. Now, when we talk about Webpack, there are four concepts that are important for us to understand on how Webpack works on things.
There are four concepts that are important for us to understand on how Webpack works on things.
- The first one is entry. Entry is a point that which the Webpack should start and follow down to build the dependency graph.
- The Second part is what we’ll call the output. In Webpack, the output is the set of bundles that are Webpack prepares on your behalf.
- The third one is loaders. Files that are not JavaScript, they have to be transformed and then put into your bundles by using appropriate transformations and then they will be added into your dependency graph. This is where the use of the various plugins come in.
- The plugins help you to perform the various actions and custom functionalities, like compilations that you need to do for building up your bundles. So, it will help you to transform your CSS into a way that you can package into your JavaScript bundles and so on.
For more information,
For GitHub repository, https://github.com/kakabisht/React_Course_assignments
For the previous blog on react blog, https://programmerprodigy.code.blog/2020/08/15/front-end-web-development-with-react/


One thought on “Introduction to React-Redux”