Q. How to use the react-Redux package for binding your react to your Redux application ?
So, you will take your react component, what we call as the component that previously was holding the state. When you move the state into the Redux store, you want your react component to be able to obtain the copy of the state. So, within our example application we’ll take our main component and tie it to the Redux store through the connect method that is made available react-Redux package. So, this will enable you to connect your component to the Redux store. What does connect provide for you? The connect provides a wrapper container component. Remember we talked about container components in the previous module. So, when you use connect, the connect automatically generates container component around the component within which you apply this. And then, that allows you to connect to the Redux store. And then the state can be obtained from the Redux store within your application.
Yarn commands to add redux and react-redux to your react application,
yarn add redux
yarn add react-redux
How do I connect my react component to the Redux store? How do we synchronize the state changes? How do we obtain any state modifications to automatically update the state in our react application and thereby, result in rendering of our views and so on. Then you apply that connect function to your react component. The connect function also takes two optional arguments called mapStateToProps and mapDispatchToProps.
- The mapStateToProps is called every time store state changes. So, as you recall, the Redux store, whenever it detects a state change that will emit the change, and then that will result in your component need to go back and pull in the state from the Redux store. Now, because you are connecting your react component to the Redux store, so to this connect, when you supply this mapStateToProps, the state here means the Redux state. So, that state will be mapped into the props of your component. And so, the state information becomes available to props in your react component, and those props can then be parsed down to your children as required in your application. Now similarly, previously we’ve been implementing all state changes by implementing functions within the main component which will be called by your child components.
- Now, changes to the state will have to be dispatched to the Redux store. Now, this is facilitated through this mapDispatchToProps.
const mapStateToProps = state => {
    return {
        dishes: state.dishes,
        comments: state.comments,
        promotions: state.promotions,
        leaders: state.leaders
    };
};

const mapDispatchToProps = (dispatch) => ({
    fetchDishes: () => { dispatch(fetchDishes()) },
    fetchPromos: () => { dispatch(fetchPromos()) },
    fetchComments: () => { dispatch(fetchComments()) },
    fetchLeaders: () => { dispatch(fetchLeaders()) },
    });
We need to set up the reducer function because our store needs to know what to do when an action is dispatched to it.
React Store becomes available to all the components within my React application. So, that’s the change that I need to make to the app.js file. Now, the last step is to make use of the Connect from react-redux to connect my React application to the Redux Store.
For more information,
- React and Redux
- Redux Basics Documentation
- The Flux Architecture
- Redux Tutorials
- Flux Architecture In Depth Overview
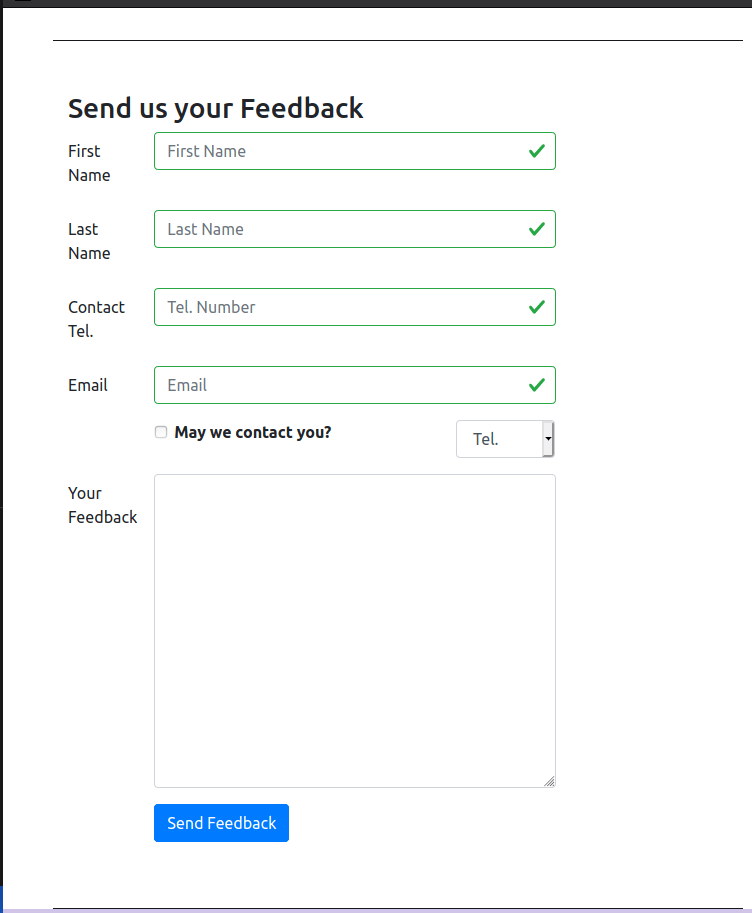
React Redux form
Now, with the introduction of redux into our react application, we can take advantage of the availability of the redux store in order to process the information within our form into the redux store. Now this is where the new package called react-redux-form comes to our aid. It provides you with a lot of features that enable you to leverage redux for your form persistence and also form validation.
This is a versatile, fast and intuitive library for creating complex and performant forms in React using Redux. Now, the React-Redux-Form itself persist the state of your form into a model in the redux store. And React-Redux-Form also provides a collection of reducer creators and action creators for us that enables us to do all this work for us without writing much coat. Now that’s where the React-Redux-Form takes care of all the grunt work behind persisting the form in the Redux store.
Say, for example, you are on a view and you’re filling out a form and then you navigate out of the view. Now very often when you have standard react components, when you move out of a view, the state of the, whatever local state that you stored in that component will get destroyed. And so when you return to the same view, if you had filled up a form, the form would remain unfilled and deployed. Suppose you want to persist the state of the form even across page reloads or as you navigate in and out of a view, then React-Redux-Form would be of use to you. So, this is achieved by the form data being stored in the redux in a model. And all the details of how this persistence is done is automatically taken care of by React-Redux-Form without us needing to do any reducer functions or the action creators on our behalf. And also, React-Redux-Form brings in its own support for validation
<Row className="form-group">
        {/*The simple f-o-r, for, will be confused with JavaScript's for, so that's why we'll have to use label htmlFor here. */}
        <Label htmlFor="firstname" md={2}>First Name</Label>
        <Col md={10}>
            <Control.text model=".firstname" id="firstname" name="firstname"
                placeholder="First Name"
                className="form-control"
                // Validadting all the condtions at line 9
                validators={{
                    required, minLength: minLength(3), maxLength: maxLength(15)
                }}
                 />
                 {/* For all the errors due to a particular validation */}
            <Errors
                className="text-danger"
                model=".firstname"
                show="touched"
                messages={{
                    required: 'Required',
                    minLength: 'Must be greater than 2 characters',
                    maxLength: 'Must be 15 characters or less'
                }}
             />
        </Col>
    </Row>
    <Row className="form-group">
        <Label htmlFor="lastname" md={2}>Last Name</Label>
        <Col md={10}>
            <Control.text model=".lastname" id="lastname" name="lastname"
                placeholder="Last Name"
                className="form-control"
                validators={{
                    required, minLength: minLength(3), maxLength: maxLength(15)
                }}
                 />
            <Errors
                className="text-danger"
                model=".lastname"
                show="touched"
                messages={{
                    required: 'Required',
                    minLength: 'Must be greater than 2 characters',
                    maxLength: 'Must be 15 characters or less'
                }}
             />
        </Col>
    </Row>
For more information,
- React Redux Form Documentation
- The boring React Redux forms
- How to populate react-redux-form with dynamic default values
- Should you store your form state in Redux?
Redux Actions
So, what exactly are Redux actions? Redux actions are payloads of information that are sent from your application to the store in order to effect any change in the store’s ticket. Now, when you send an action to the store, you use the store’s dispatch method to send the action to the store.
Now, when that action is constructed, what exactly does the action contain? The action is a plain JavaScript object. Now, when you define the structure of this JavaScript object, this JavaScript object should contain a type field or a type of property, which indicates what type of action this is. So when this action is delivered to a Reducer function, the Reducer function will be able to interpret what type of action that is, and then initiate the appropriate action to change the state of our store there.
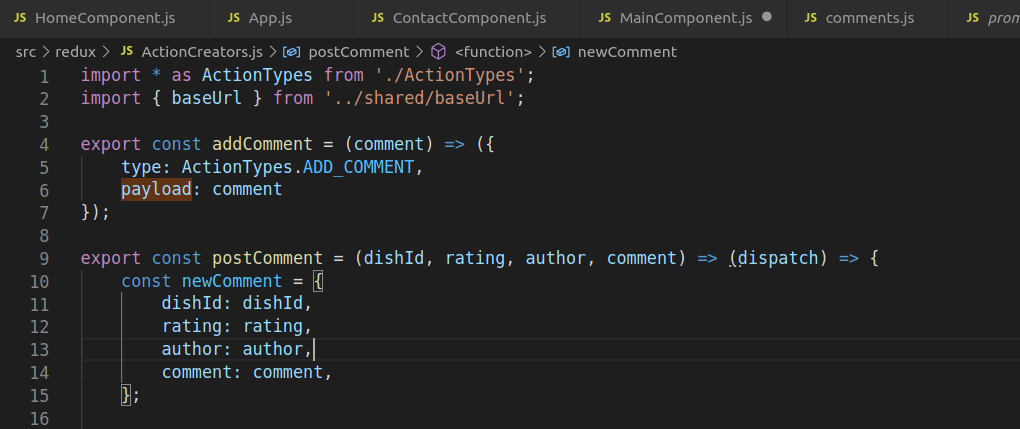
So, the type field is essential or the type property is essential in the JavaScript object. The rest of the JavaScript object can contain anything that is meaningful to your application, any data that is required for the action to be created. Now, this is what we will refer to as the payload which comes as part of your action.
To help us generate various actions, we make use of action creators. The action creators are nothing but functions that will return the action JavaScript object. So this function encapsulates the process of creating this action JavaScript object. Now, the resulting action object can then be passed to your store through the dispatch action. So, you will use the action creator to create an action object and then dispatch it to your store using the store dispatch method. Within your store, you have Reducers that take in the action as one of the parameters, and then takes in the previous state or the current state of your application as the other parameter and that generates the used state. So the Reducer should take the previous state of action and return the next state. Now, when it generates the next state, one thing that we have emphasized earlier also and I’ll emphasize again, is that we should never mutate the current state. So, when you need to return the next to state, you will make a copy of the state, and then make modifications to this copy, and then return that copy from the Reducer function there.
So, you’ll see that your Reducer function receives the previous state and the action. Now, when the action is received, the action has to be then examined and then based on the type, a property in the action. So now you’ll see the reason for the type property in action. Based on the type property of the action, you will write typically that the Reducer function as a switch statement. So you will use the action type as the switch. And then switch on the action type, and then decide what needs to be done within your Reducer function. Now, the default case is that, if your Reducer is not going to act on that action supplied, sometimes the user may not have to make any changes to the part of the state that it controls in response to an action being delivered to it. In that case, it would simply return the previous state.
So, every action object should contain a type. So, how do we define the type? This is where we will use the action types and then add comment here. So, now you see the reason for defining the action types in a separate file and then importing it in here and then you can easily define the type to Redux. All the types of actions are all captured in the action types there and then you can import it
For a simple application, a single Reducer function may be more than sufficient, but when you have complex applications especially when the state of your application has many parts, then it is more easier to split your Reducer into multiple functions. So depending on the shape of the state, you can split the Reducer into multiple functions and then each such function will be dealing with one part of the state. And then after that, you can recombine them to form the overall Reducer function.
To combine them together, Redux provides us with a method called as combineReducers. So, we will import the combineReducers in here, and then when we create the store here. Instead of just doing Reducer initialState, we will say, combineReducers. And inside this combineReducers, we will specify how exactly to combine the various Reducers that we have defined here. The four simpler Reducers that we have defined here. So, to compose the overall global state, we have to map these Reducers into each one of the four properties there.
Now, I will follow a standard pattern and then define the second part as the payload. The payload contains whatever needs to be carried in so the data that is sent back by the addComment. This is just my way of defining it, and if it is a very natural way of specifying whatever data needs to be carried in the action object to the reducer function here.
So, when you submit the comment, you’ll see that the submission of the comment will trigger action to be sent to your redux store, and then this action will result in the comment being added into the comments part of the state of your redux store, and then when the changes, then that will result in the store emitting a change, and that will result in your main component going and getting the updated state from the redux store, and then the main component passes the new state to all the chilled components, and then when you come down the RenderComments component realizes that the comments part has changed, so it will have to be rendered. So, react takes care of re rendering that with new the comment added into the list there. So, now you see how an action can trigger a change in the redux store and that immediately gets reflected back into our react applications view there.
For more information
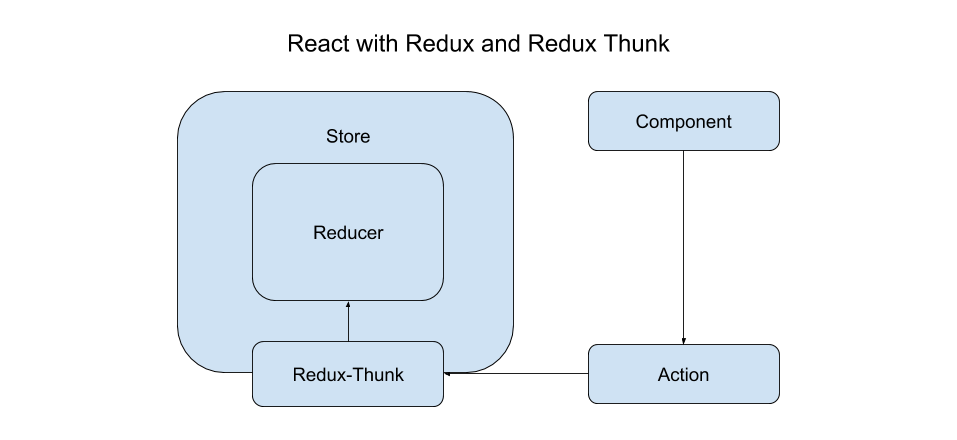
Redux Thunk
Now sometimes when you dispatch a Redux action, you may want to intercept it on its way to the tool and make some modifications to the action before letting it pass through on to the store. Now this is where the Redux Middleware and Redux Thunk come to our help.
So what exactly is thunk? So thunk is in programming. What we mean by thunk is a subroutine that is used to inject an additional calculation into another subroutine. So this is a way to delay a calculation and its result is needed and also allows you to insert operations at the beginning or the end of another subroutine.
So before that point, you can intercept action and effect some changes before the action reaches the reducer. So this is a place which enables third party extensions to be injected into your Redux application. So for example, if you want to log all the actions that have been dispatched, that is a good point for you to first capture the action, log what the action is and then let it move on to the reducer, and then you can then log the state of the application after the action is effected.
Similarly, if you want to allow asynchronous API calls, so for example, you dispatch an action but the action would initially require access to a server from radio fetch the data and then send the data into your Redux store. Then that is also a good place to interject a middleware in order to intercept the action and then carry out basing API call and then let the action proceed forward into the store.
So the middleware can be typically used for inspecting the action and then also the state. You can even modify the action, you can dispatch all that actions and then wait for the results from those actions before you allow this particular action to take place, you could even stop an action from reaching the reducers if it is something that you wish to do, and so on
So there are many applications for a middleware that allow you to achieve your end goal. Then you need to use the middleware in your Redux application then you use that applied middleware function that is available from Redux, and so this will enable you to set up the middleware pipeline, and then this returns a store enhancer. So when you call ”Apply middleware,” it will return a store enhancer which you can then pass in as a parameter to the create store function that we have already seen being used when we created the store.
So the inner function that you define inside a thunk gets access to both the dispatch as well as get state store. What does this permit you to do? Because you have access to get state, you can examine the state and then see if this action fits and can be allowed with the current state. So that would allow you to even modify the action, and also you’ll get access to dispatch. So for example, you can stop the current action, do something else, come back and then dispatch the action into the reducers.
The logger middleware that we have put into our application. How does the logger middleware work? Now to see the logger middleware’s operation in your browser, open your JavaScript console of your browser. So in the console, what does the logger do? The logger prints out all the various actions that are dispatched and also as you can see, it shows the previous state, the action and the next state.
Now, if we want to make use of the full power of the React-Redux-Form whereby the form state is persisted in the Redux store instead of in the components state, then we need to update our form to make use of the regular form rather than the local form from the React-Redux-Form. The React-Redux-Form brings in its own set of support for all these on our behalf, so we don’t need to write our own reducers or our action creators and so on, React-Redux-Form fills in all the details by itself.
For more information,

One thought on “Introduction to React-Redux”