Single Page Applications
In traditional websites so far, you may be requesting for access to a particular page. For example, you will be requesting for an index to an HTML page when you navigate to the website either by clicking on a link or by typing the address of the website into the address bar of your browser. So typically, the index.html page is the first one that your fetch when you visit a website. When the page is downloaded from the server to your browser, and then this will be displayed in your browser. Now, this may include not just the index.html page but also other resources that may be needed to be downloaded in order to construct the index.html page. But now, if you navigate to another page in your website, say for example, another page like contactus.html, this will result in your browser sending another request to the server to fetch the second page. So it will initiate an entire requested server and then all the resources needed for constructing the second page will have to be downloaded from the server.
So as you move from one page to another page, it will involve every new page to be loaded from the server and this would involve a roundtrip time to the server to fetch all the resources required for constructing those pages. Now, imagine that your website has many pages then obviously, every single piece that your web page requires for rendering will require a full roundtrip time to the servers.
What you would notice often is that many of these pages have a lot in common. Perhaps for example, the header, the footer and some other piece of information, but still every single new page request will require you to go and fetch the entire page from the server. Now with the use of caching on the browser site, you can mitigate some of these problems by reusing the already fetched resources from your cache, but still every new page that you navigate to will require an entire page to be reloaded from the server site. Single-page applications approach this problem in a different way.
In a single-page application, typically, we have developed a web application. So, when the browser navigates to the website, then this will request for the web application to be downloaded from the server site. So this will be, for example, contained in a master page like index.html, which will trigger an entire set of assets that are required for rendering your web app to be downloaded to your client’s site. Now how these assets are packaged depends upon how you design your application and also, what framework you use to design your web application. You have one single large download at the start of your web application.
Subsequent changes to the client site, for example, initiated by a click on a link, will initiate a new request to the server site. But in this case, very often you’re only downloading some data, perhaps in the form of JSON data from the server site. So in this case, each of these may require only access to a server just to download the JSON data for example, which then may enable you to completely render the new view in your single-page application. So the initial page download, the initial application download, of course is always there but most subsequent interactions with the server will be simply for downloading data, typically in the form of JSON or XML depending on how you design your data format. Once the data is downloaded, this data can be then used to render the new view within your application. So in this circumstances, you will save a lot of roundtrip time to the server for downloading a lot of assets.
The significant feature of a single-page application. Also, single-page applications enable you to deliver a user experience that is more closer to what they see with desktop applications. Once the initial web app is downloaded, thereafter, most other interactions would seem like you are interacting with a desktop application. So you can mask a little bit of the initial download time for the web application by doing partial rendering from the server site itself.

For more information,
Forms
A way of setting up forms in your React Application whereby your form information is directly tied into the state of your React component that is hosting the form. So, any changes that you make to your form imports will be immediately reflected into the state of your React component and so, the state of the form, or the information that the form is always reflected in that state of the React component can’t be retrieved from there.
Q.How does your React Application get input from the forms and then make use of it?
Before we understand that part, they have to realize that, every one of these form elements in HTML maintain their own state within DOM. And then they will update it based on user input. So in a text box for example, if you’re typing value, that input value that you type in will be retained in the DOM by that input box.
Now, we want to be able to connect that into our React components state, so that any changes to a box will be immediately reflected into React component state. Similarly, from the state, we can set the initial value for any of these form elements. So, how do we do this?
This is where the user control components in React come to aid. So, what is a Controlled Component? Controlled component makes the React component itself control the form that it renders. So when you include the form into the view of a React component, then you can easily tie in the React component state to the form, so that it will become the single source of truth. So the form information, whatever is the state of form will reflected into the state of the React component, so the form state and the components state will be match with each other. And this kind of implementation is what is referred to as a control component in React.
Now, with the control component, every state mutation, anytime you change any of the state, it will have to be reflected into the state of your React component. So you need appropriate handler functions that will enable change. So for example, if there is any change in a box, then that change should be immediately reflective to the state of your React component. Similarly, when the user clicks on the submit button, the submitted value should be captured inside your React component and thereafter can be processed as required by your React Application. So all this requires implementation of handler functions.
Form validations
Now for the form itself, I will use another property here called touched, which will keep track of whether a particular field has been touched or not.
Furthermore, we will validate the form each time the form is written, so we’ll implement a function called validate which will take in the Current values .
Now where do we invoke this? We will invoke this in the render function, because every time there is a change in your input fields, your form will be rerendered. And so that will be the appropriate time for you to carry out the check. And if there is an error in any one of them, the errors string or errors object that is returned from here will contain the error message in the corresponding strings image.
// Different validations
const required = (val) => val && val.length;
const maxLength = (len) => (val) => !(val) || (val.length <= len);
const minLength = (len) => (val) => val && (val.length >= len);
const isNumber = (val) => !isNaN(Number(val));
const validEmail = (val) => /^[A-Z0-9._%+-]+@[A-Z0-9.-]+\.[A-Z]{2,4}$/i.test(val);
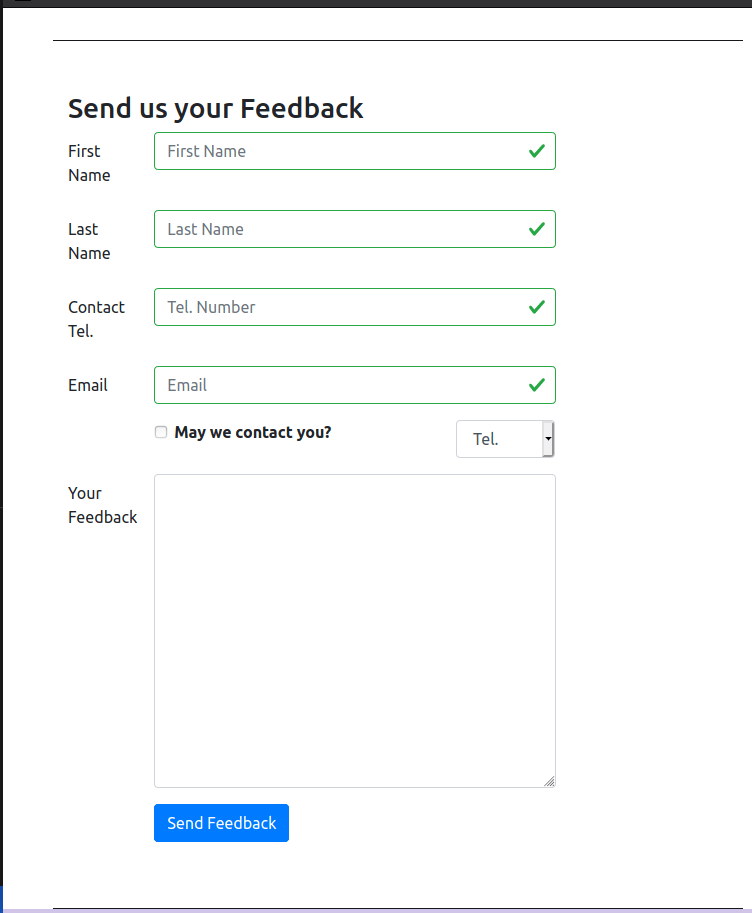
1.Controlled forms
So, since this is tied to the state of the React Application, the submission of the Form should be handled within the React Application. Not only that, whenever anything is changed in any of these elements, that should be reflected by changing the state of the component to reflect whatever is in the box here.
In the code, we will implement two different methods here.
- handleInputChange, which will receive the event as a parameter.
- handleSubmit which also receives the event as a parameter.
So, when you click on the Submit Button, the handler Submit should the called. Then when the Form is submitted
So in the handleInputChange method, we’ll make sure that this is invoked upon any change to any input value in our form. When this is invoked, then we will retrieve the target input from the event that has just been parsed in.
Now, how do we tie these two together? So to tie these two together, in your form for each of these items, for each of these inputs, I need to tie the onChange to this handleInputChange, so onChange. So whenever this input is changed, any change is made to the input, then this will result in a call to the handleInputChange, which will reflect the change in the input value back to the state of my form there
2 <FormGroup row>
                    <Label htmlFor="firstname" md={2}>First Name</Label>
                    <Col md={10}>
                        <Input type="text" id="firstname" name="firstname"
                            placeholder="First Name"
                            value={this.state.firstname}
                            valid={errors.firstname === ''}
                            invalid={errors.firstname !== ''}
                            onBlur={this.handleBlur('firstname')}
                            onChange={this.handleInputChange} />
                        <FormFeedback>{errors.firstname}</FormFeedback>
                    </Col>
                </FormGroup>
                <FormGroup row>
                    <Label htmlFor="lastname" md={2}>Last Name</Label>
                    <Col md={10}>
                        <Input type="text" id="lastname" name="lastname"
                            placeholder="Last Name"
                            value={this.state.lastname}
                            valid={errors.lastname === ''}
                            invalid={errors.lastname !== ''}
                            onBlur={this.handleBlur('lastname')}
                            onChange={this.handleInputChange} />
                        <FormFeedback>{errors.lastname}</FormFeedback>
                    </Col>
                </FormGroup>
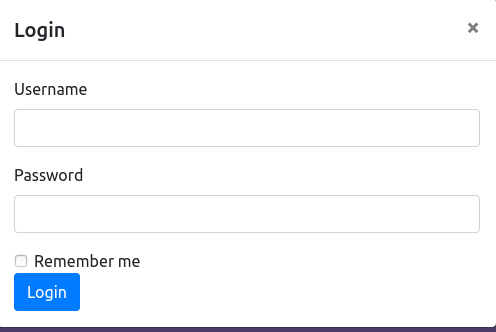
2.Uncontrolled forms
Sometimes you will wish to have a very simple form with a very limited amount of interaction of that with your React component. In that case an uncontrolled form is a much easier way of setting up forms within your React application.
Now this approach of using uncontrolled forms is a lot more easier in situations when you are mixing your React application code with non-React code. So maybe you have a project that is already setup with some non-React part, and then you’re adding in React components or React elements to that project to set up some parts of the project.
So how do we retrieve this information? Now every, DOM form element has a ref associated with it, from which you can easily use thatch to extract their HTML form data into your application.
So, you see that when retrieving the values directly from the DOM and then using that here and then alerting, and then we’ll see
Now, since we are using this inside reactstrap. Reactstrap already uses ref for something else. So, in reactstrap components input we should use innerRef, instead of Ref here, innerRef here. So, we’ll say innerRef equal to input this.username equal to input. So, that is how you retrieve the information from inside your input field.
<FormGroup>
        <Label htmlFor="username">Username</Label>
        <Input type="text" id="username" name="username"
         innerRef={(input) => this.username = input} />
</FormGroup>

<FormGroup>
        <Label htmlFor="password">Password</Label>
        <Input type="password" id="password" name="password"
         innerRef={(input) => this.password = input}  />
</FormGroup>
For more information,
- Controlled Components
- reactstrap Form
- Controlled / Uncontrolled React Components
- Controlled and Uncontrolled Input Values in React
- Controlled and uncontrolled form inputs in React don’t have to be complicated
- How to Work with Forms, Inputs and Events in React
- Some Thoughts On Forms in React
- Instant form field validation with React’s controlled inputs
For GitHub repository, https://github.com/kakabisht/React_Course_assignments
For the following blog on react-redux, https://programmerprodigy.code.blog/2020/08/16/introduction-to-redux/


Thanks for this article, it is totally useful and super informative!
To be honest, normally I choose React Native, it is something quite similar, but there are some important differences between these two languages. It is not only clear and easy to learn but functional as hell! If you want, you can read more about this language here: https://www.miquido.com/blog/is-react-native-the-right-choice-for-your-business/
LikeLike